Install PostgreSQL, MySql and SQL Server on Apple Silicon


Becoming a recent owner of Apple's shiny new 15" Macbook Air was my first foray into Apple's exciting new ARM chips where they've somehow managed to package all day battery life with performance exceeding my primary Intel iMac 5K Desktop into the the thinnest of form factors.

As a .NET developer that primarily develops on Windows/WSL and deploys to Linux x86 servers I've been hesitant to move to Apple's new ARM hardware architecture with the potential friction and incompatibilities that might entail, however with more ServiceStack Customers moving to Apple's new computers it's become increasingly important to also ensure we can deliver a great development experience of ServiceStack on Apple Silicon.
Everything just works
What I wasn't expecting is for all the development tools I use daily would not only work flawlessly, but to do so natively with all running native ARM builds:
- Oh My Zsh
- .NET SDK
- Rider
- Node.js
- VS Code
- Docker
- GitHub Desktop
- Discord
- DataGrip
This has got to be the smoothest transition to a new general purpose CPU architecture in the history of computing of which credit should go to all involved, Apple for making new hardware so appealing to encourage mass adoption and all developers of these products for releasing native macOS ARM builds to support their Users on Apple Silicon.
Installing all popular RDBMS's
Our OrmLite multi & cross-platform ORM is the first product we want to profile and benchmark to ensure it also has great performance on Apple Silicon. For this I wanted to have local installations of each supported Sqlite, PostgreSQL, MySql and SQL Server RDBMS to load test against, which as it was easier than it should be, I wanted to document here so that it's hopeful useful for others needing to do the same thing.
Installing developer tools has not only become frictionless, but in today's world of ubiquitous Docker adoption, it's become much easier to run complex RDBMS software on macOS ARM, even SQL Server - the unlikeliest of combinations!
First thing you'll need to install is Docker Desktop for macOS by clicking on their Apple Chip download which will let you run each RDBMS in a containerized Docker App.
After Docker is running, installing and running PostgreSQL and MySql can be done with a single command:
Install and run PostgreSQL
docker run --name postgres -e POSTGRES_PASSWORD=p@55wOrd -p 127.0.0.1:5432:5432 -d postgres
Install and run MySql
docker run --name mysql -p 3306:3306 -e MYSQL_ROOT_PASSWORD=p@55wOrd -d mysql:latest
Feel free to update commands to use your preferred strong password instead
Install and run SQL Server
SQL Server requires more resources than the popular RDBMS's and as it doesn't have a native ARM Docker Image requires a bit more configuration.
First you'll want to ensure you have at least 4GB RAM available to containers from
the Resources Tab in Docker Settings you can open with ⌘,
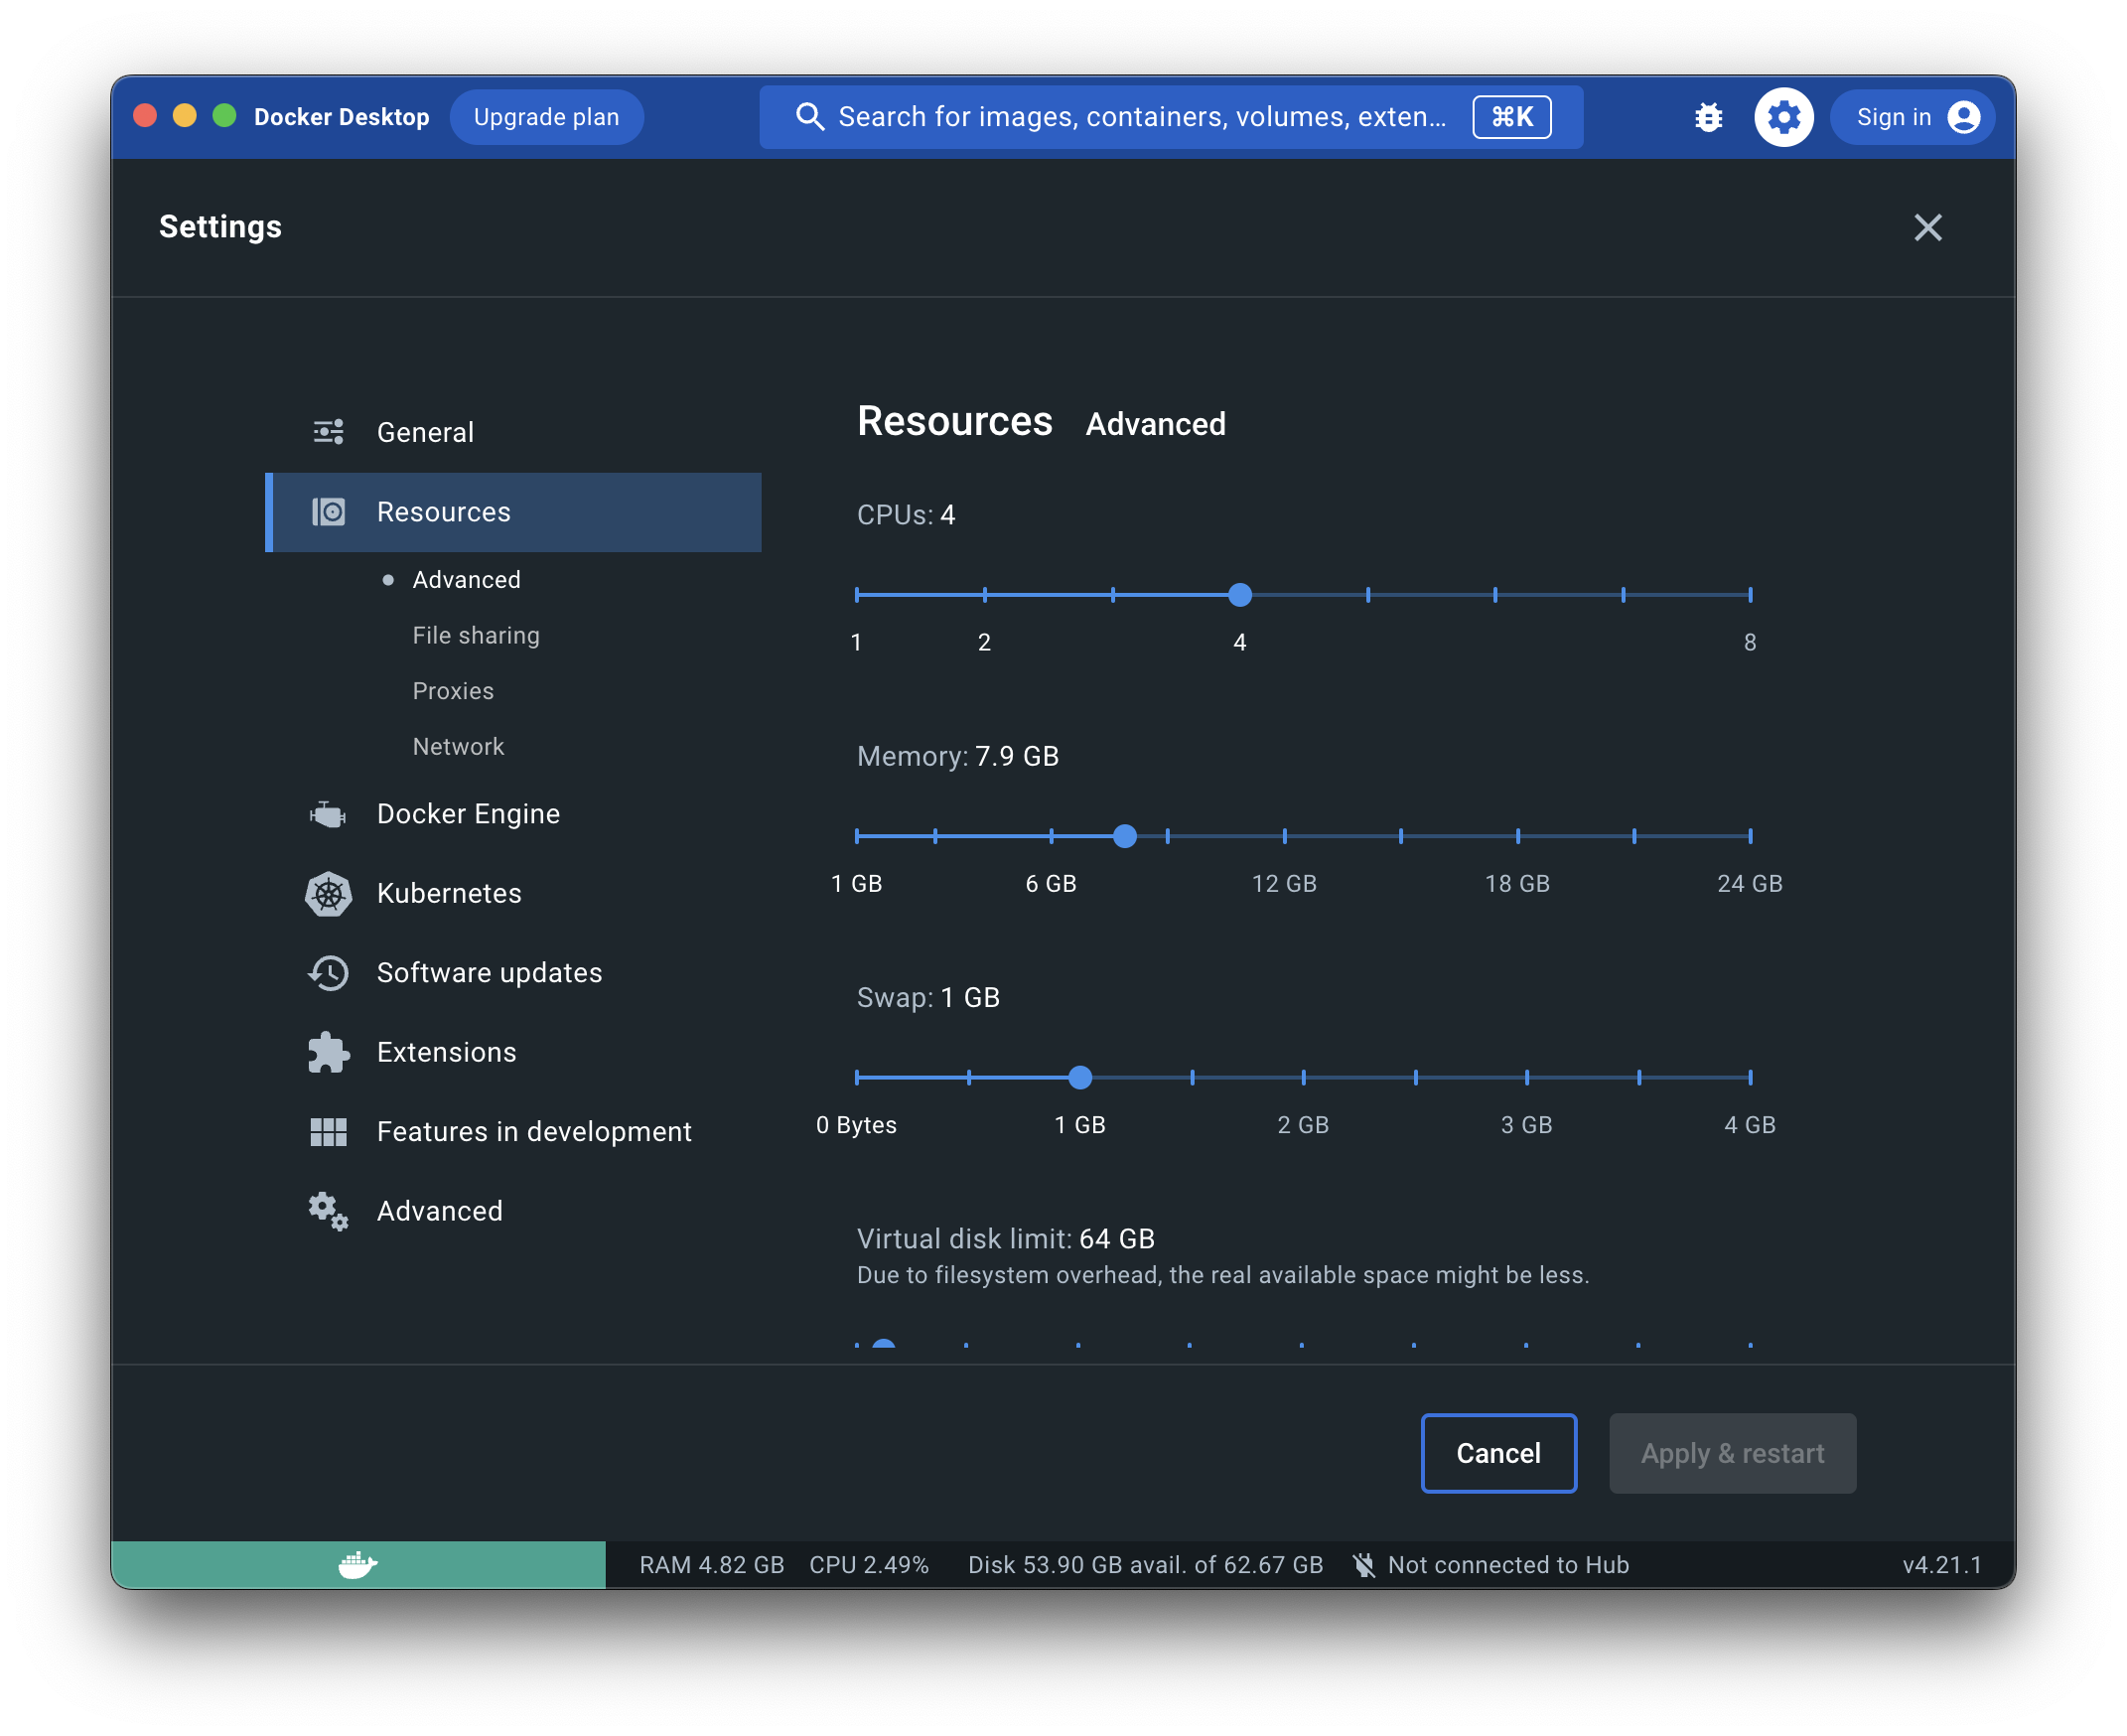
My MacBook Air's 24GB RAM configuration defaulted to 7.9 GB, if you have a lower configuration you'll want to ensure 4GB is available to SQL Server.
Next in the General tab you'll want to ensure Use Virtualization Framework and VirtioFS is checked which will allow SQL Server AMD64 Image will run on Apple's new Virtualization framework:
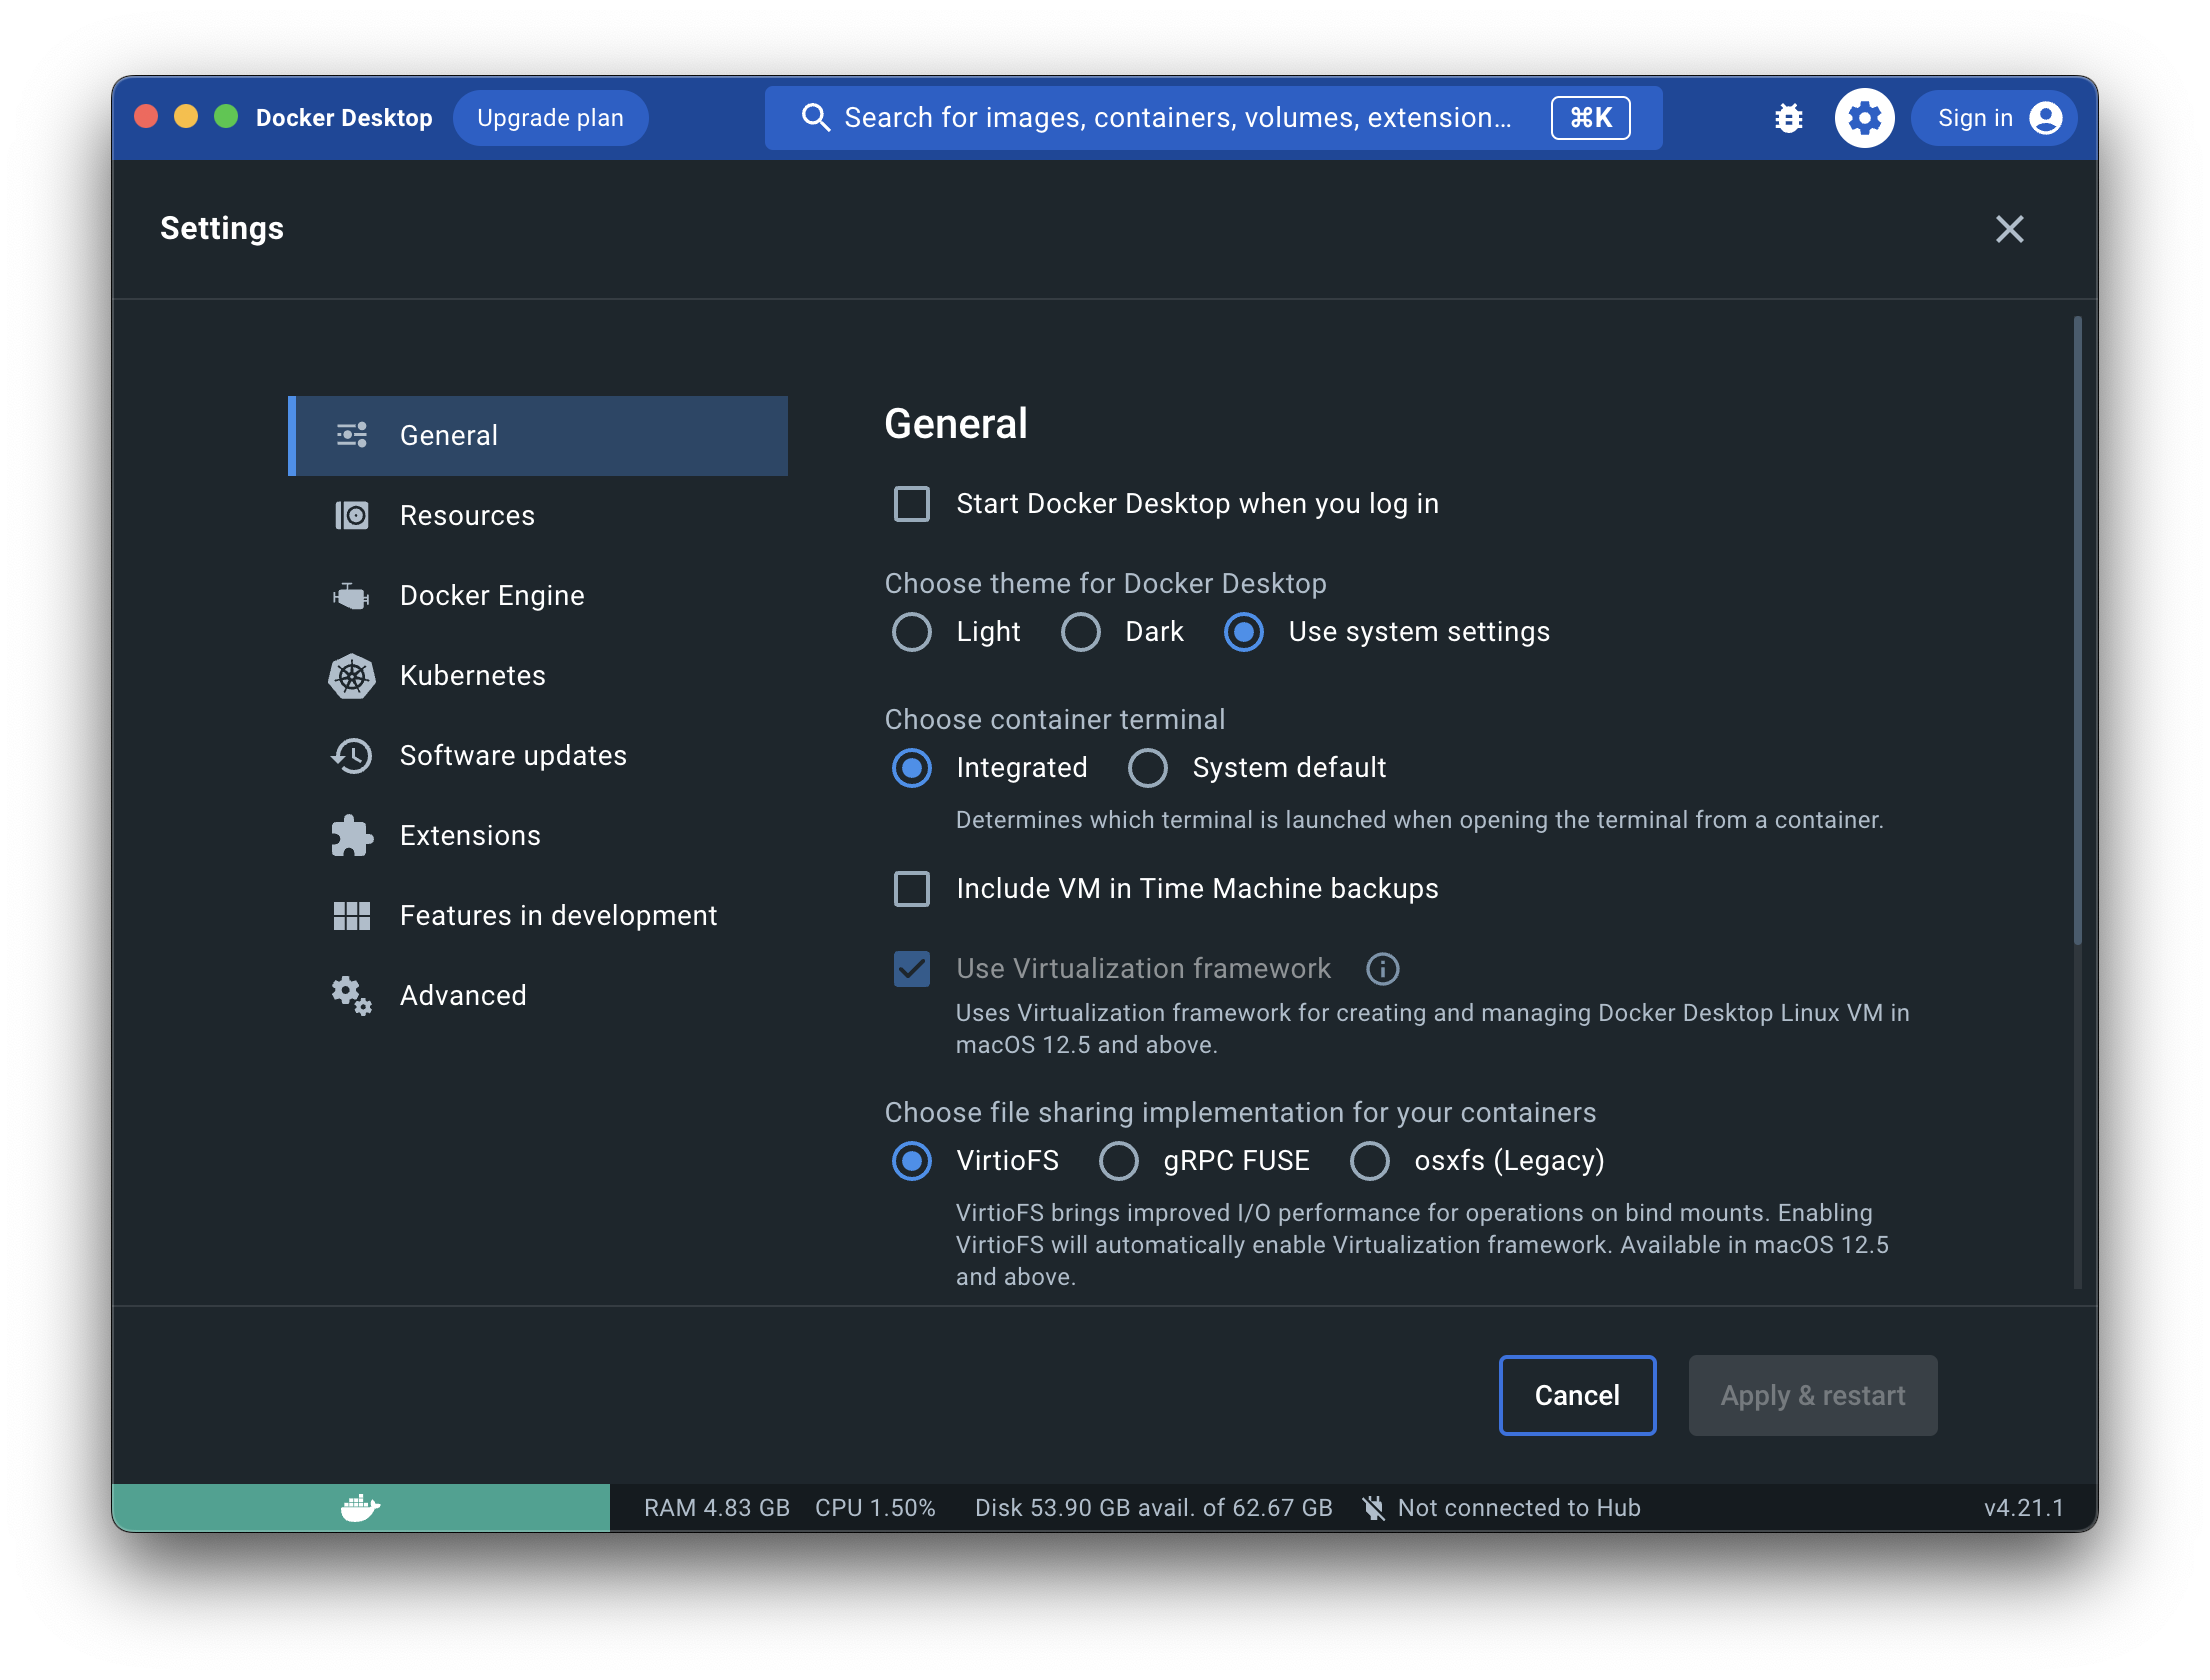
After which you'll be able to install and run SQL Server with:
docker run --platform=linux/amd64 --name mssql -e ACCEPT_EULA=1 -e MSSQL_SA_PASSWORD=p@55wOrd -p 1433:1433 -d mcr.microsoft.com/mssql/server:2022-latest
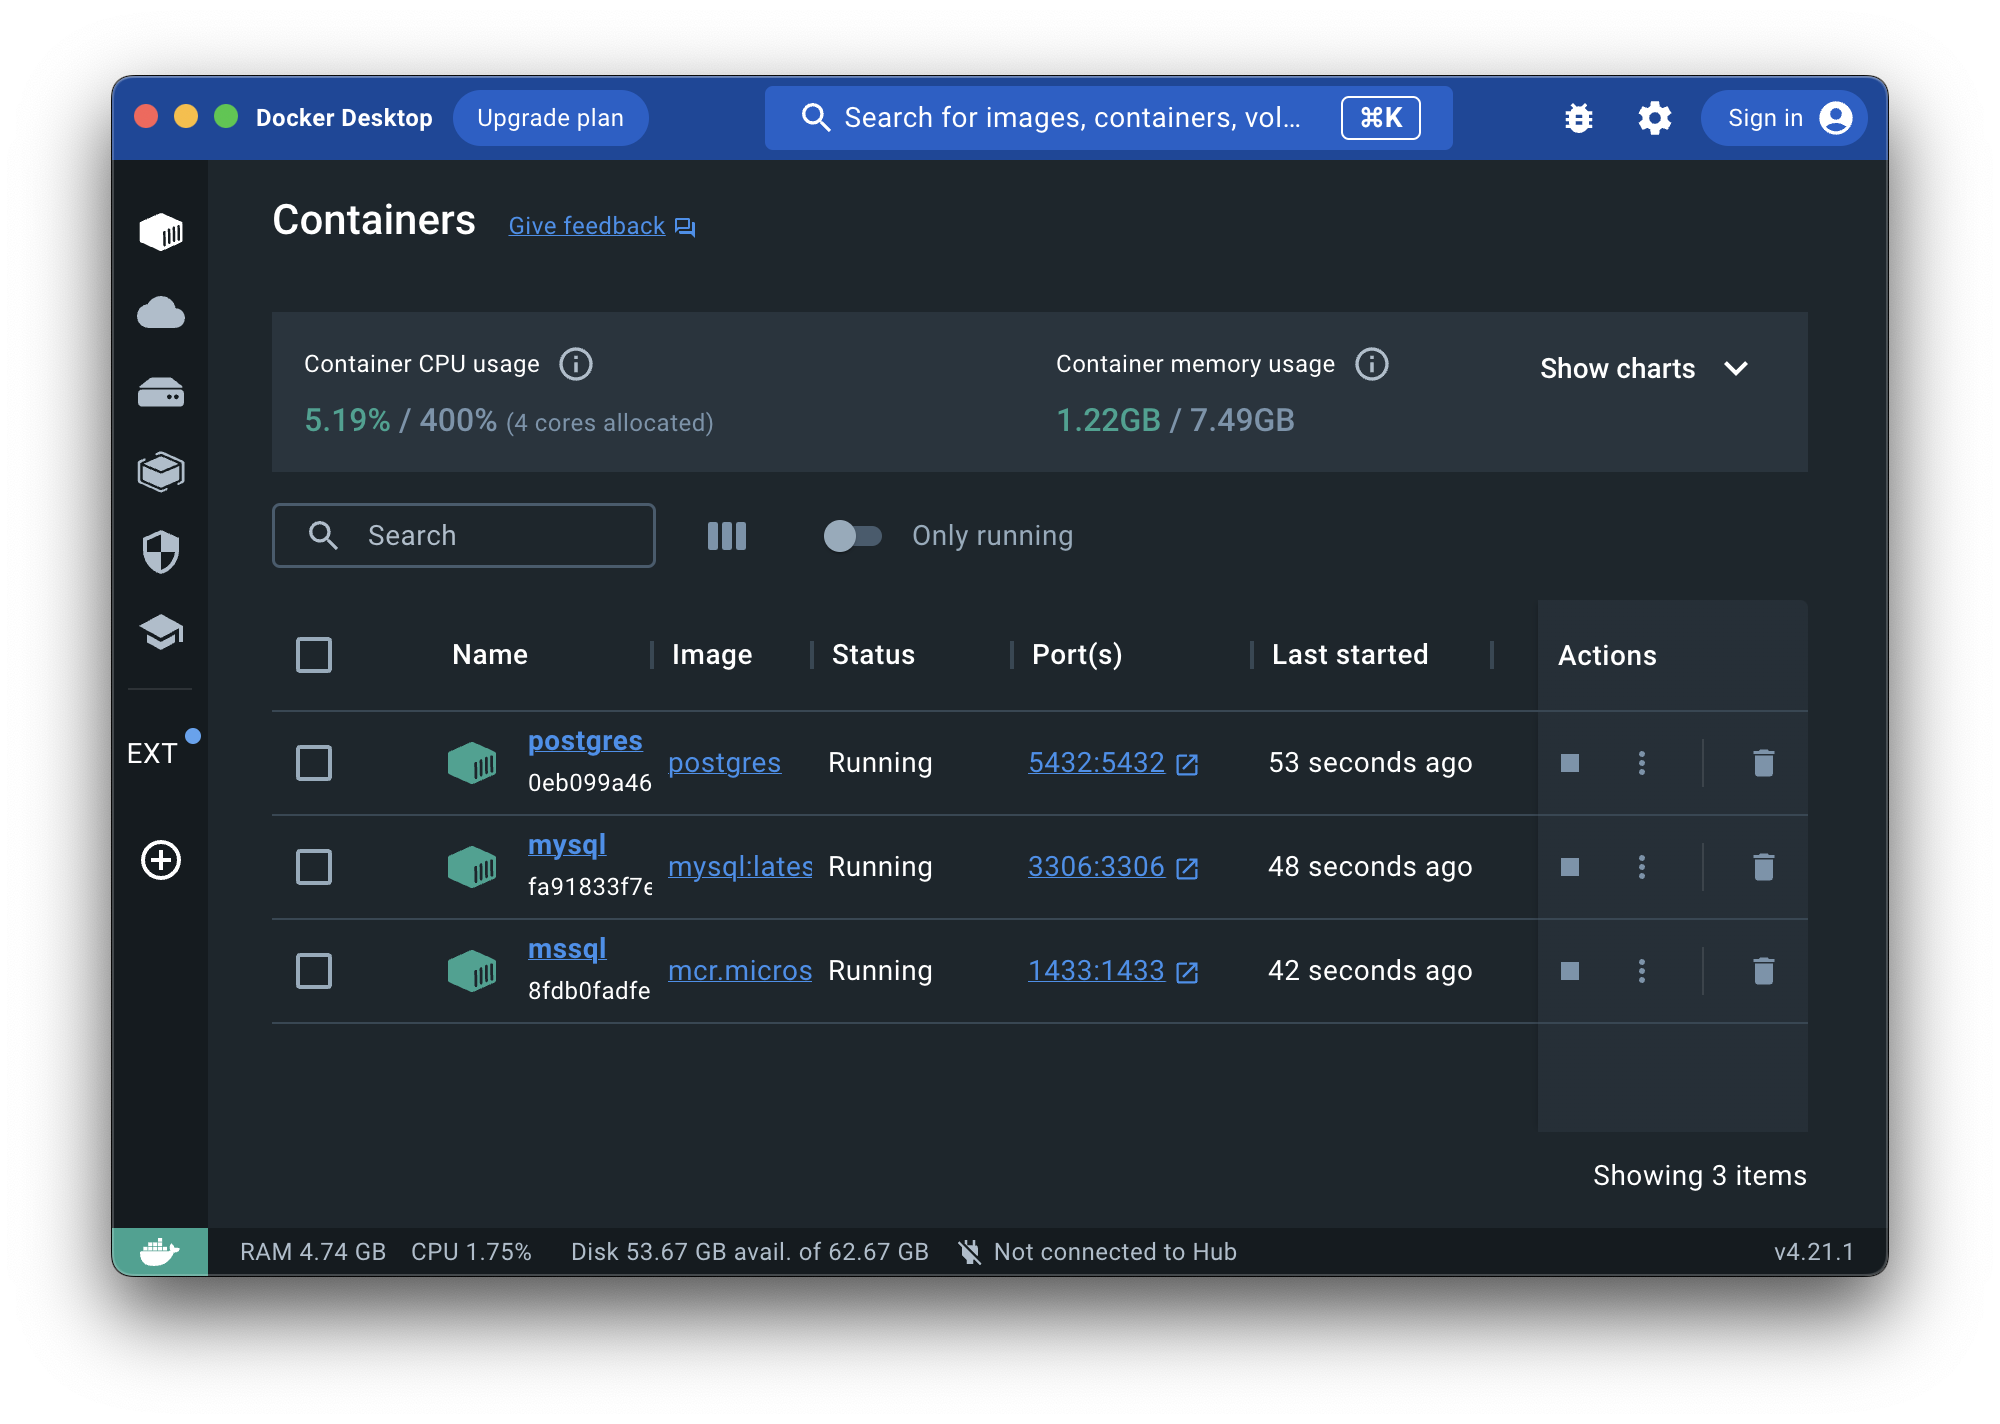
You'll be able to check if all Docker containers are now running by clicking on the Containers tab in Docker Desktop:
lazydocker
That's pretty sweet, although I'm even more excited about lazydocker as an alternative to Docker Desktop for managing Docker containers which can be installed with:
brew install lazydocker
As it's a Terminal UI it can be run everywhere where there's a Terminal, in local and remote terminals as well as Rider and VS Code's built-in Terminal UIs where you can quickly perform Docker tasks without breaking your development workflow:

DataGrip
Now we can see they're all running, lets connect to them. You could use the command line tools specific to each database but my preference is to use JetBrains DataGrip which lets you connect and manage any RDBMS from a single Desktop App, including many of the most popular NoSQL data stores.
Connect to all Database connections
In Database Explorer, click on the + New Icon to add a new Data Source to Microsoft SQL Server, MySql
and PostgreSQL using the passwords used to run the Docker commands (e.g.p@55wOrd) and the default user names
for each RDBMS:
- SQL Server:
sa - MySQL:
root - PostgreSQL:
postgres
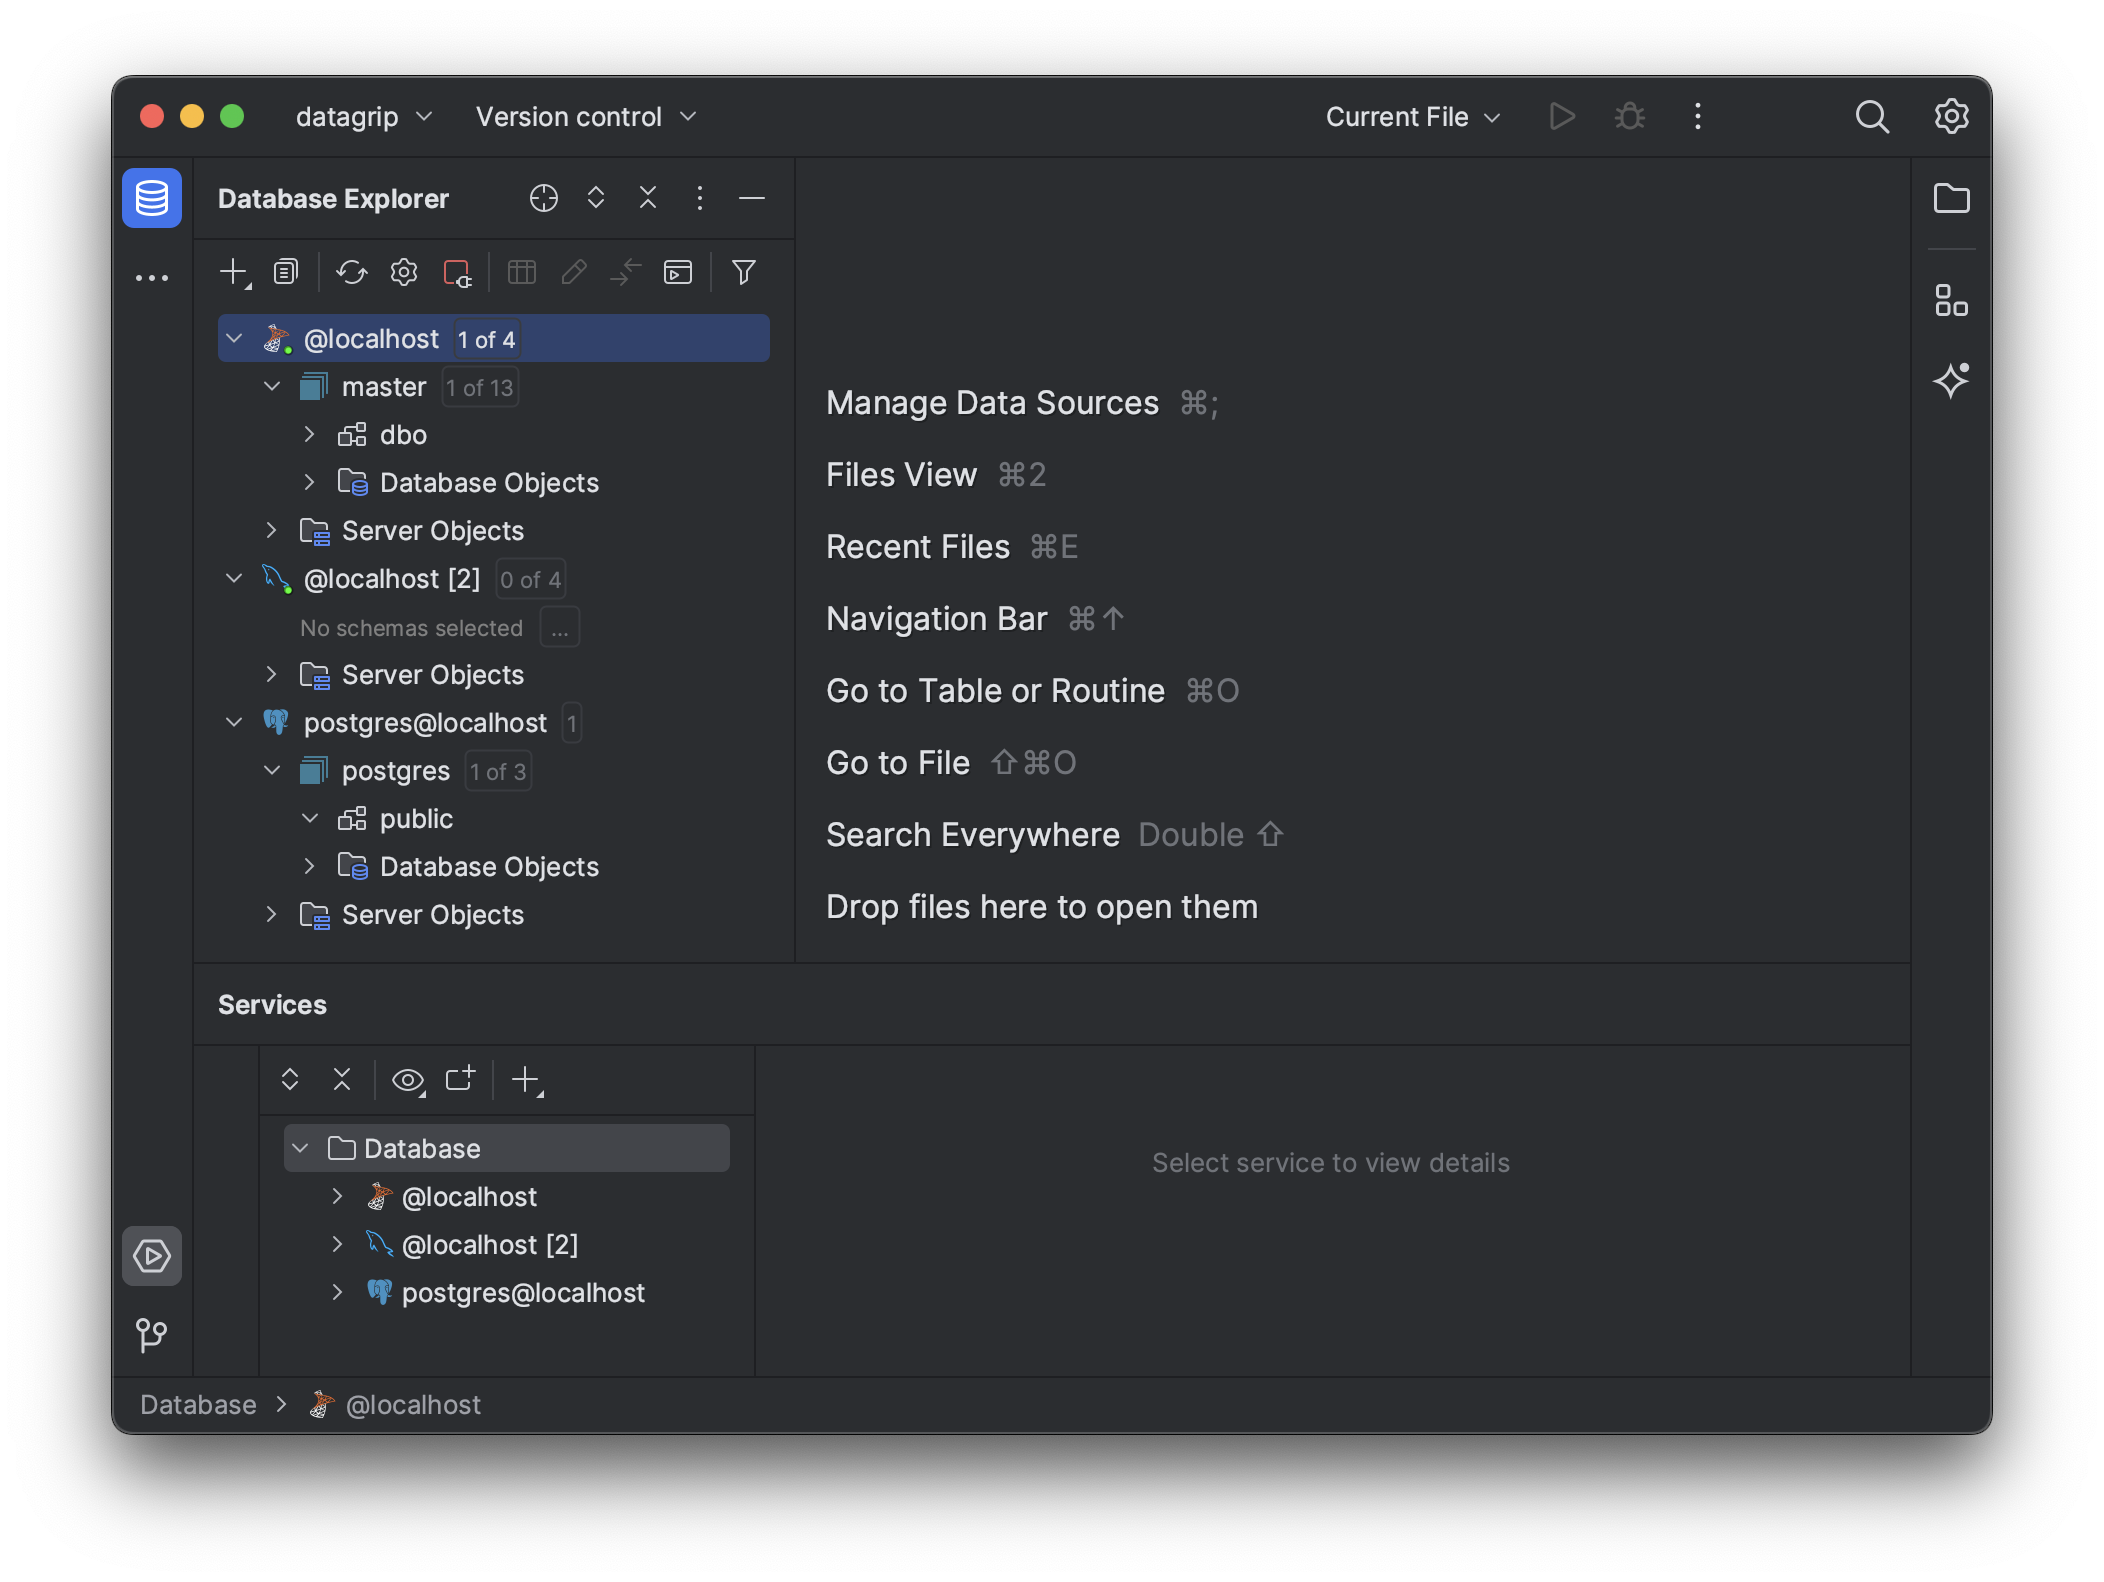
After connecting to all databases you should end up with active connections to all empty databases:
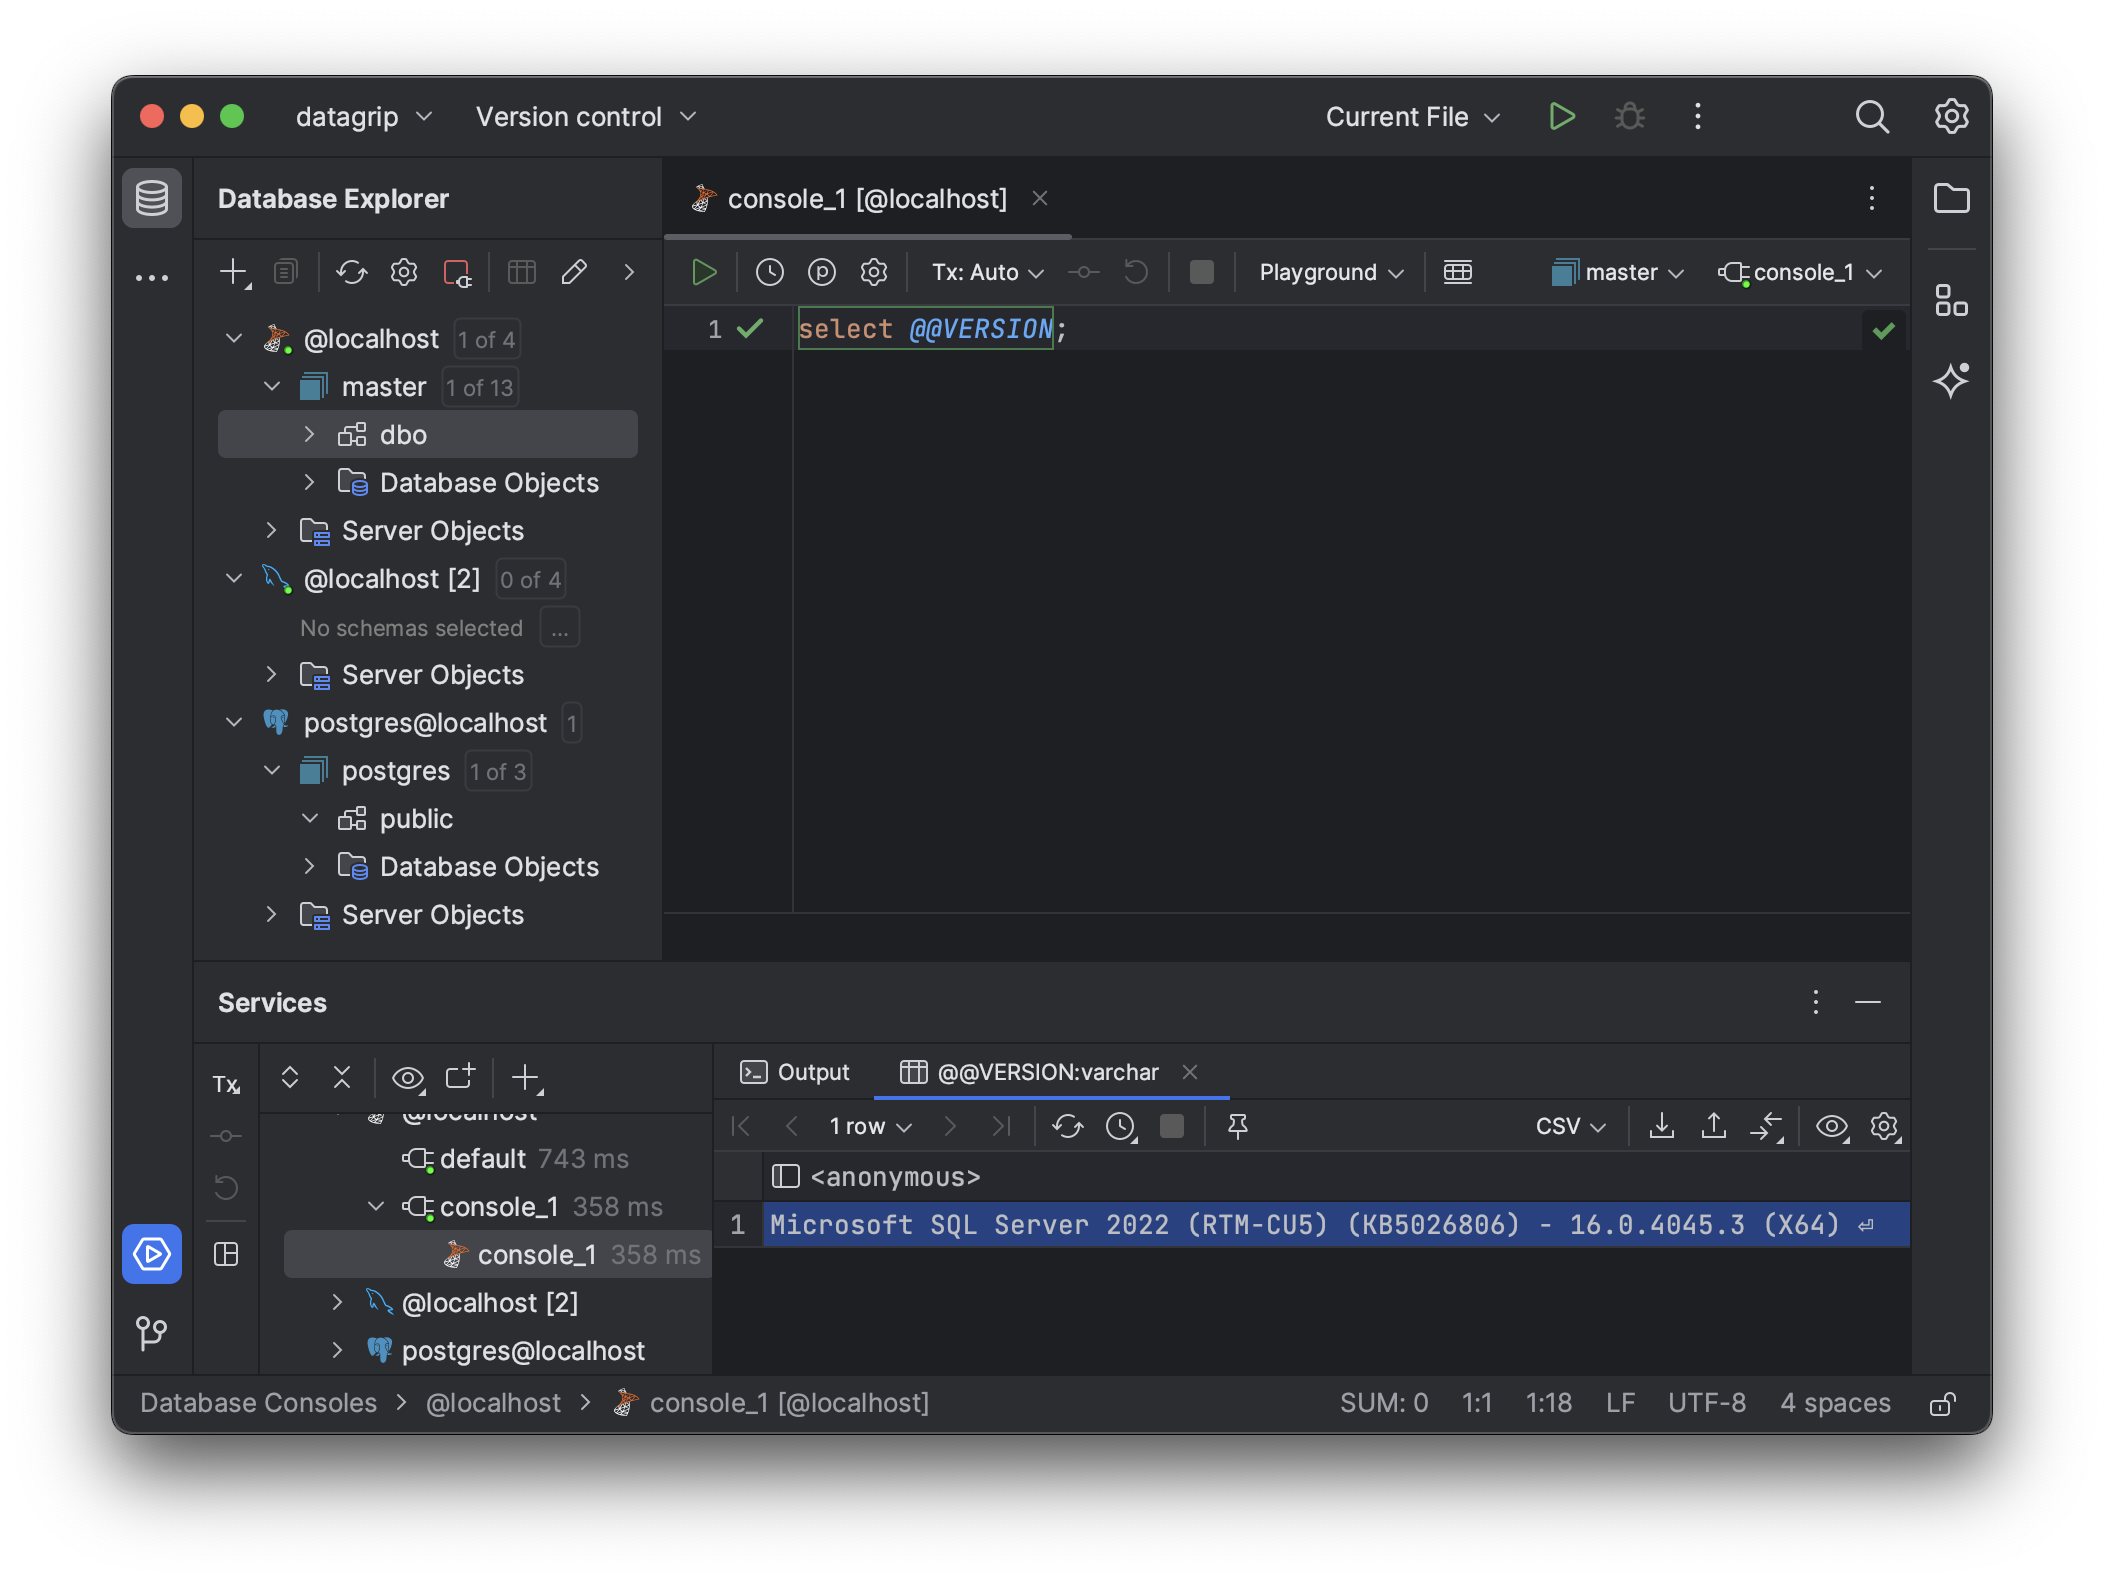
Which you can open a New > Query Console or ⇧⌘L to start executing generic queries against like SELECT @@VERSION
in SQL Server to display the version of SQL Server that's running:
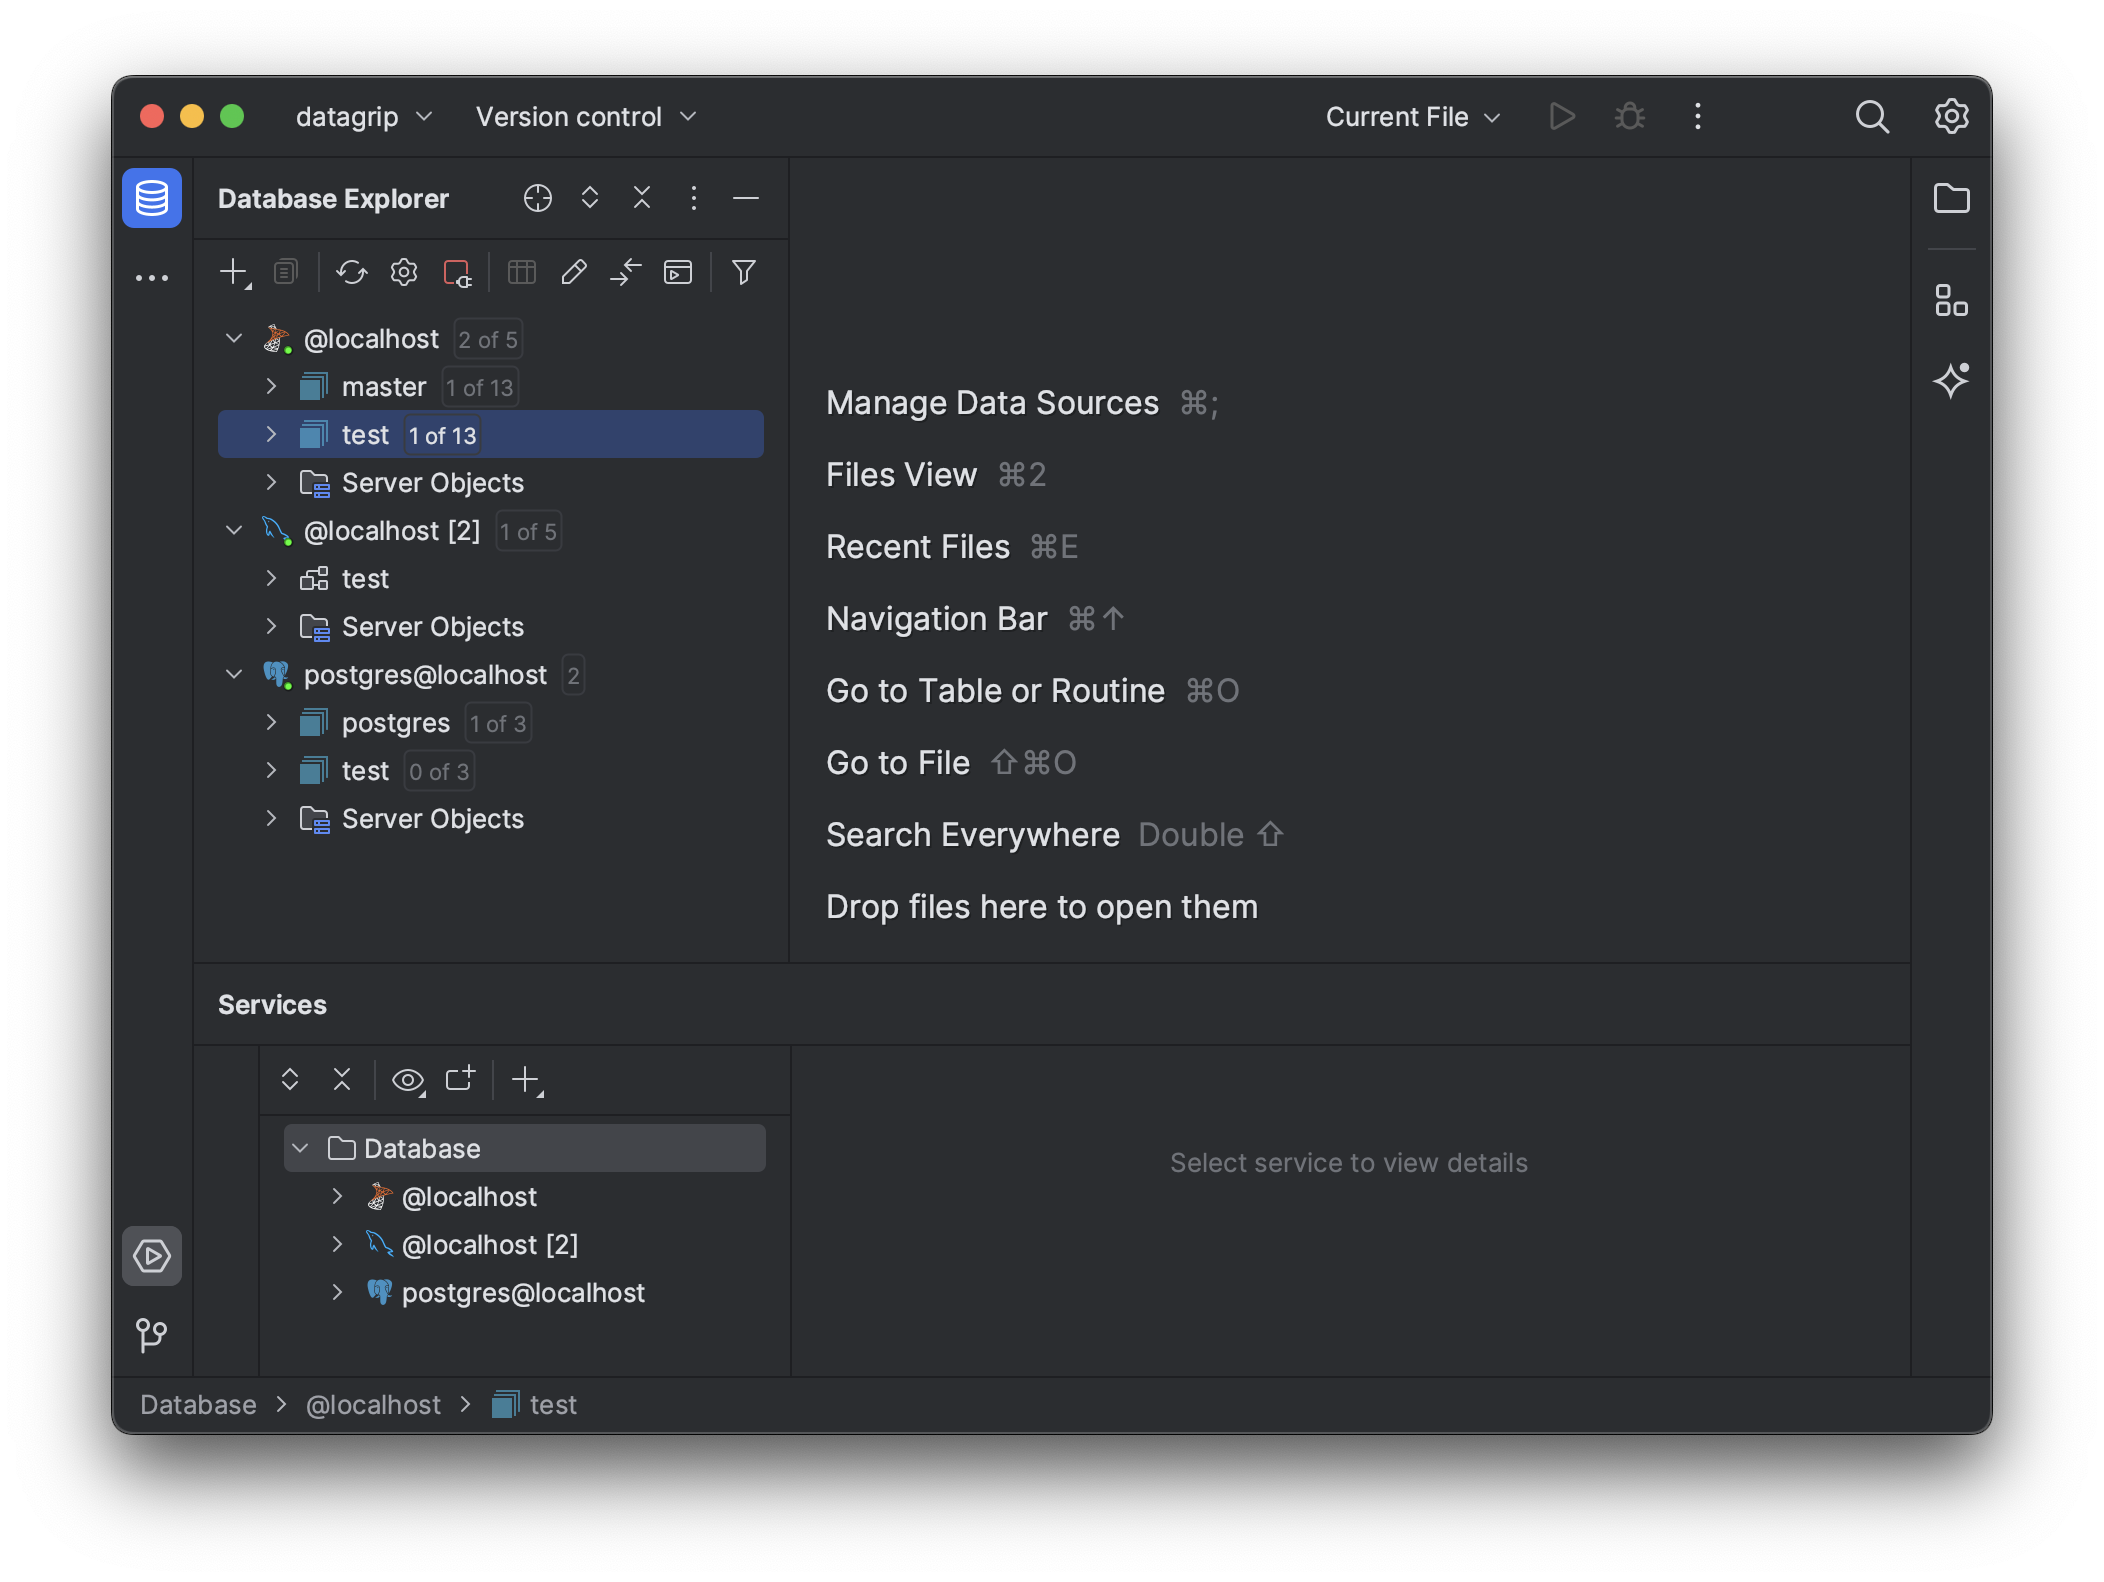
Create Test Databases
But to do anything interesting lets create test database which you can create with New > Database for SQL Server and
PostgreSQL or New > Schema in MySQL:
.NET Database Admin UI
Next thing to try is accessing them from the same Application, which ServiceStack .NET Apps have great support for with its built-in Database Admin UI which lets you browse and query an App's configured databases:
You can easily try this out from the database-enabled razor project template which adopts our Simple, Modern JavaScript approach that uses the native JavaScript Modules support in modern Web Browsers to avoid any complex npm build tooling.
We can create an App to test against your databases by installing the .NET SDK and
x dotnet tool:
dotnet tool install --global x
This will let you create any ServiceStack Project Template with your preferred Project Name from the command-line, e.g:
x new razor DatabaseTest
Which creates a new .NET App that you can open with your preferred .NET IDE or text editor, e.g:
code DatabaseTest/DatabaseTest
By default the App is configured to use a local SQLite database, we can extend it to connect to different RDBMS's
by adding the necessary RDBMS and AdminDatabaseFeature NuGet packages in DatabaseTest.csproj:
<PackageReference Include="ServiceStack.OrmLite.MySql" Version="8.*" />
<PackageReference Include="ServiceStack.OrmLite.PostgreSQL" Version="8.*" />
<PackageReference Include="ServiceStack.OrmLite.SqlServer.Data" Version="8.*" />
<PackageReference Include="ServiceStack.Server" Version="8.*" />
New dependencies can be installed with VS Code's Restore popup or by explicitly running dotnet restore.
We can then register named connections for each of our databases by replacing the existing Configure.Db.cs with:
public class ConfigureDb : IHostingStartup
{
    public void Configure(IWebHostBuilder builder) => builder
        .ConfigureServices((context,services) => {
            var dbFactory = new OrmLiteConnectionFactory(
                context.Configuration.GetConnectionString("DefaultConnection") ?? "App_Data/db.sqlite",
                SqliteDialect.Provider);

            dbFactory.RegisterConnection("postgres",
                "Server=localhost;User Id=postgres;Password=p@55wOrd;Database=test;Pooling=true;MinPoolSize=0;MaxPoolSize=200",
                PostgreSqlDialect.Provider);

            dbFactory.RegisterConnection("mysql",
                "Server=localhost;User Id=root;Password=p@55wOrd;Database=test;Pooling=true;MinPoolSize=0;MaxPoolSize=200",
                MySqlDialect.Provider);

            dbFactory.RegisterConnection("mssql",
                "Server=localhost;User Id=sa;Password=p@55wOrd;Database=test;MultipleActiveResultSets=True;Encrypt=False;",
                SqlServer2012Dialect.Provider);

            services.AddSingleton<IDbConnectionFactory>(dbFactory);
        })
        .ConfigureAppHost(appHost => {
            // Enable built-in Database Admin UI at /admin-ui/database
            appHost.Plugins.Add(new AdminDatabaseFeature());
        });
}
This will now let us access the registered databases in our APIs, but first lets populate the databases with some data.
Multi Database Migrations
When a new project is created it populates its default configured SQLite database with some test data, we can do the same
for the other registered database by duplicating the App's initial DB migration
to a new DB Migration1001.cs with:
sed "s/1000/1001/" ./Migrations/Migration1000.cs > ./Migrations/Migration1001.cs
Then annotating it with a [NamedConnection] attribute for each registered database:
[NamedConnection("mssql")]
[NamedConnection("mysql")]
[NamedConnection("postgres")]
public class Migration1001 : MigrationBase
{
    //...
}
That can then be executed with:
npm run migrate
Where it will execute all new DB Migrations, in this case apply the same Migration to each configured database.
Now that our App's databases are all populated and ready to go, we can run it with:
npm run dev
Then view the built-in Admin Database UI at:
https://localhost:5001/admin-ui/database
and signing in with the Admin user created in Configure.AuthRepository.cs:
admin@email.comp@55wOrd
Where it displays all the App's configured database tables on its home page:
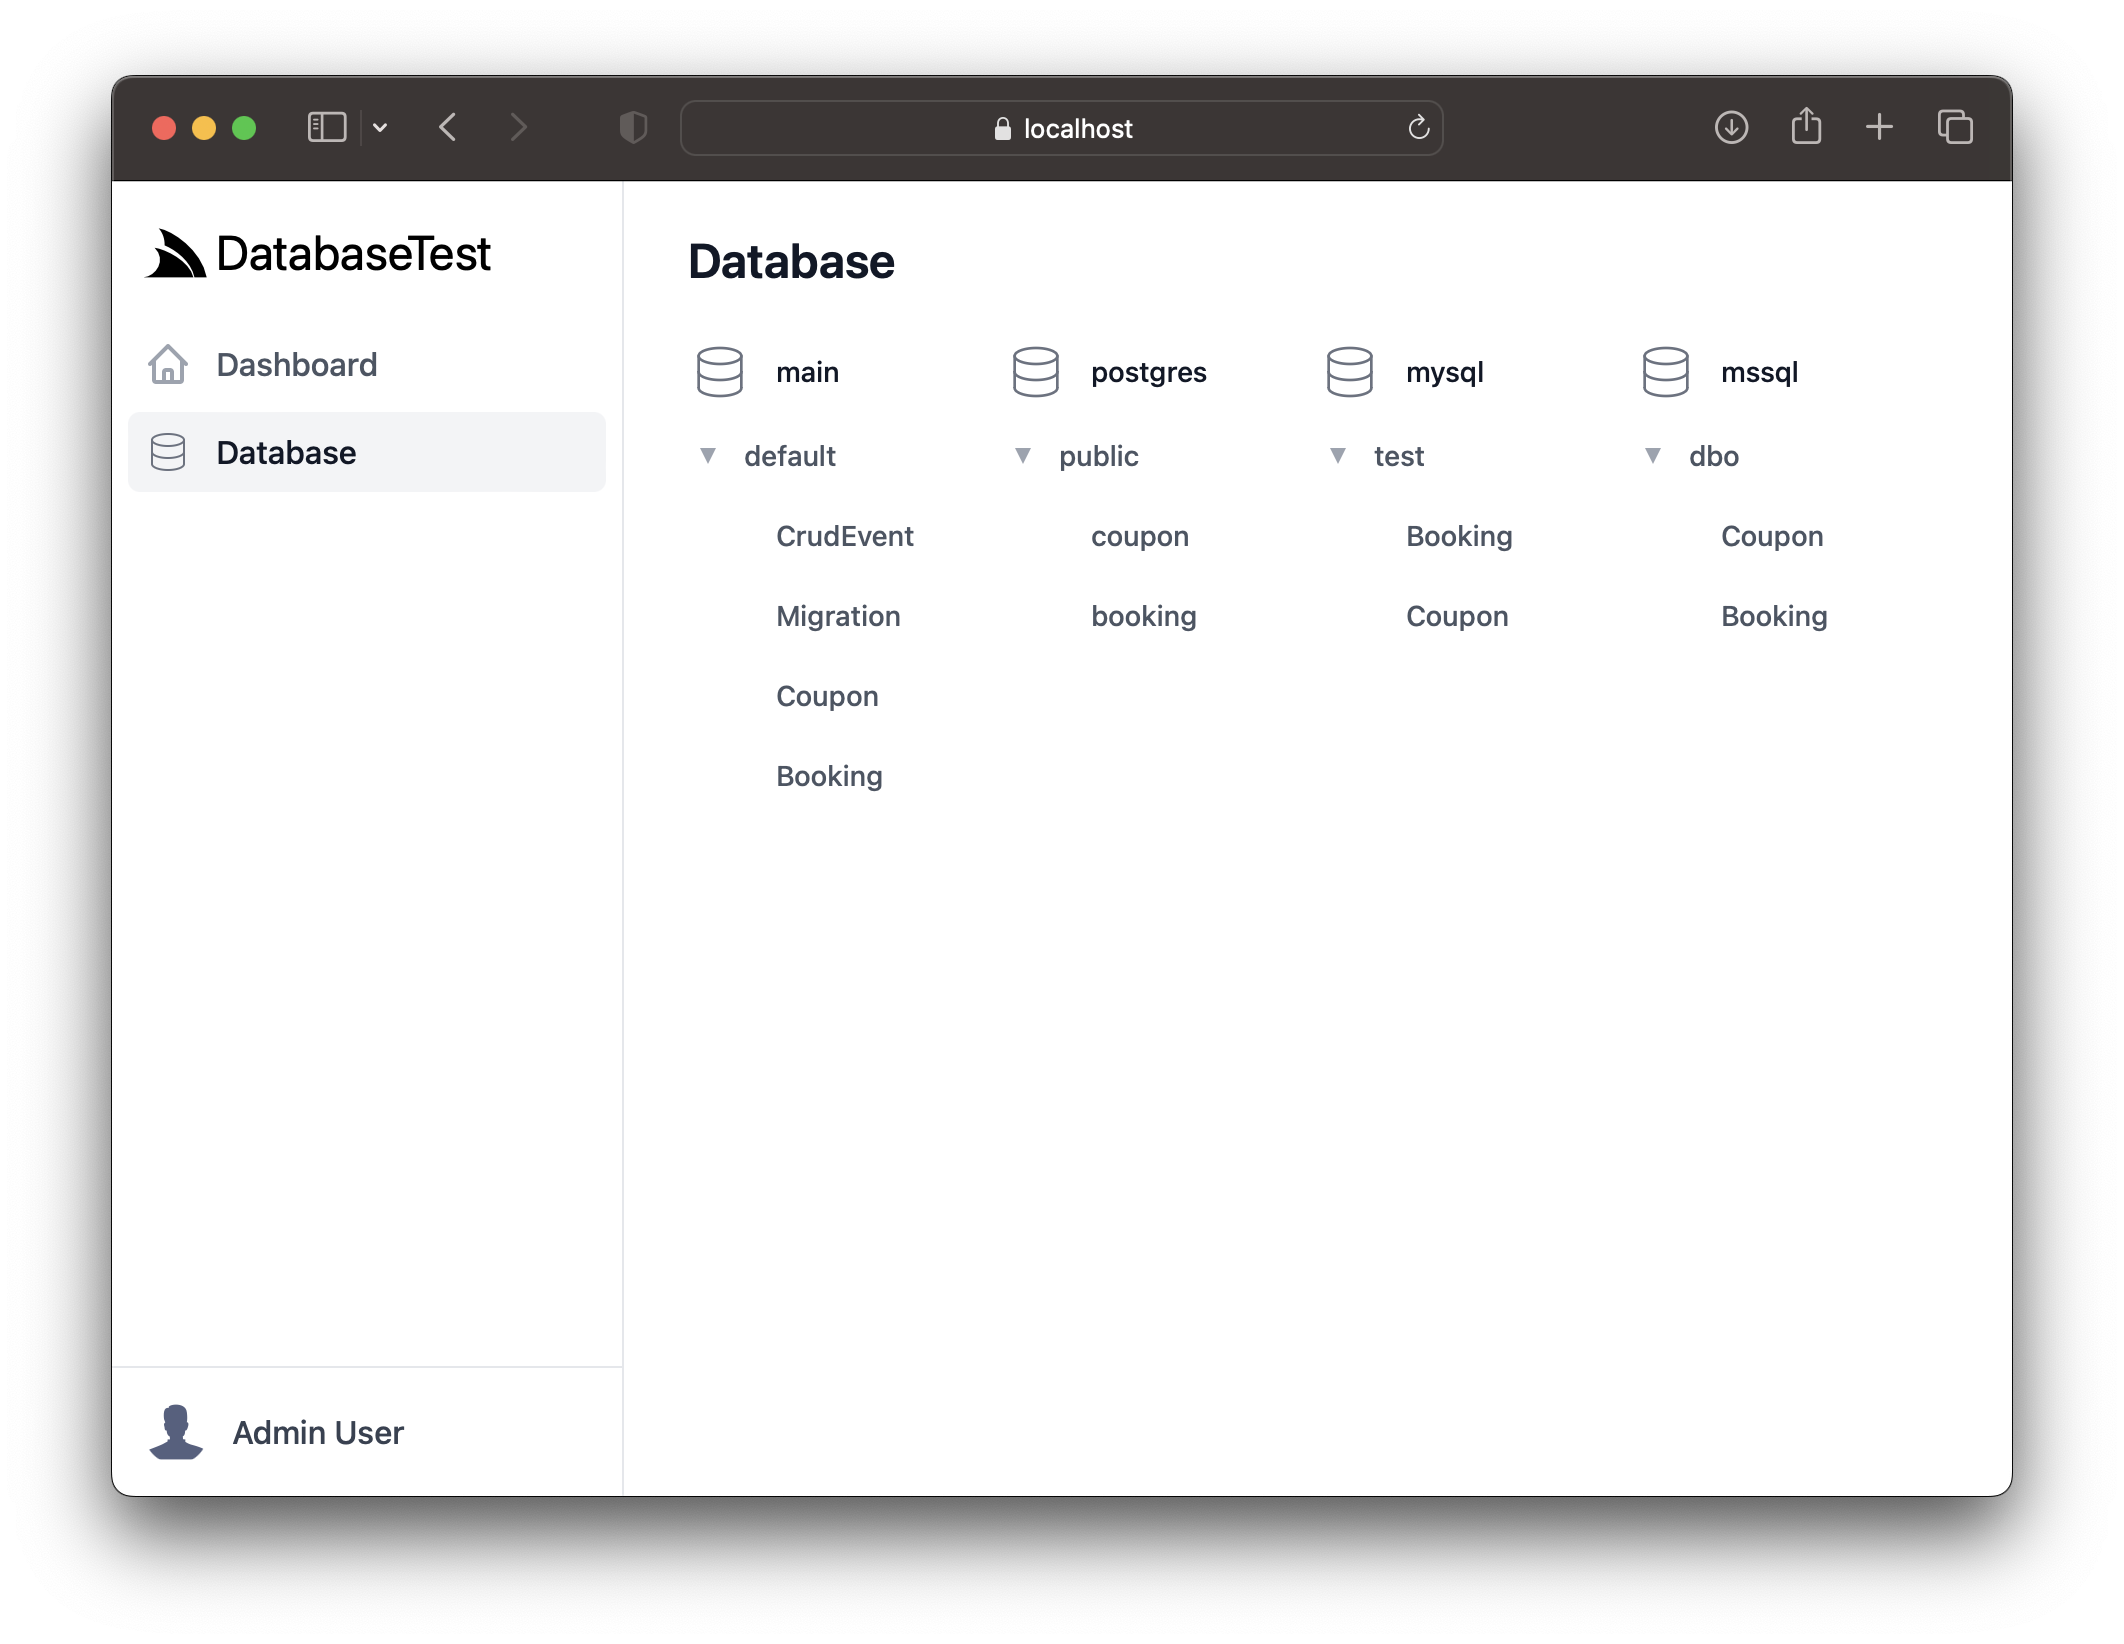
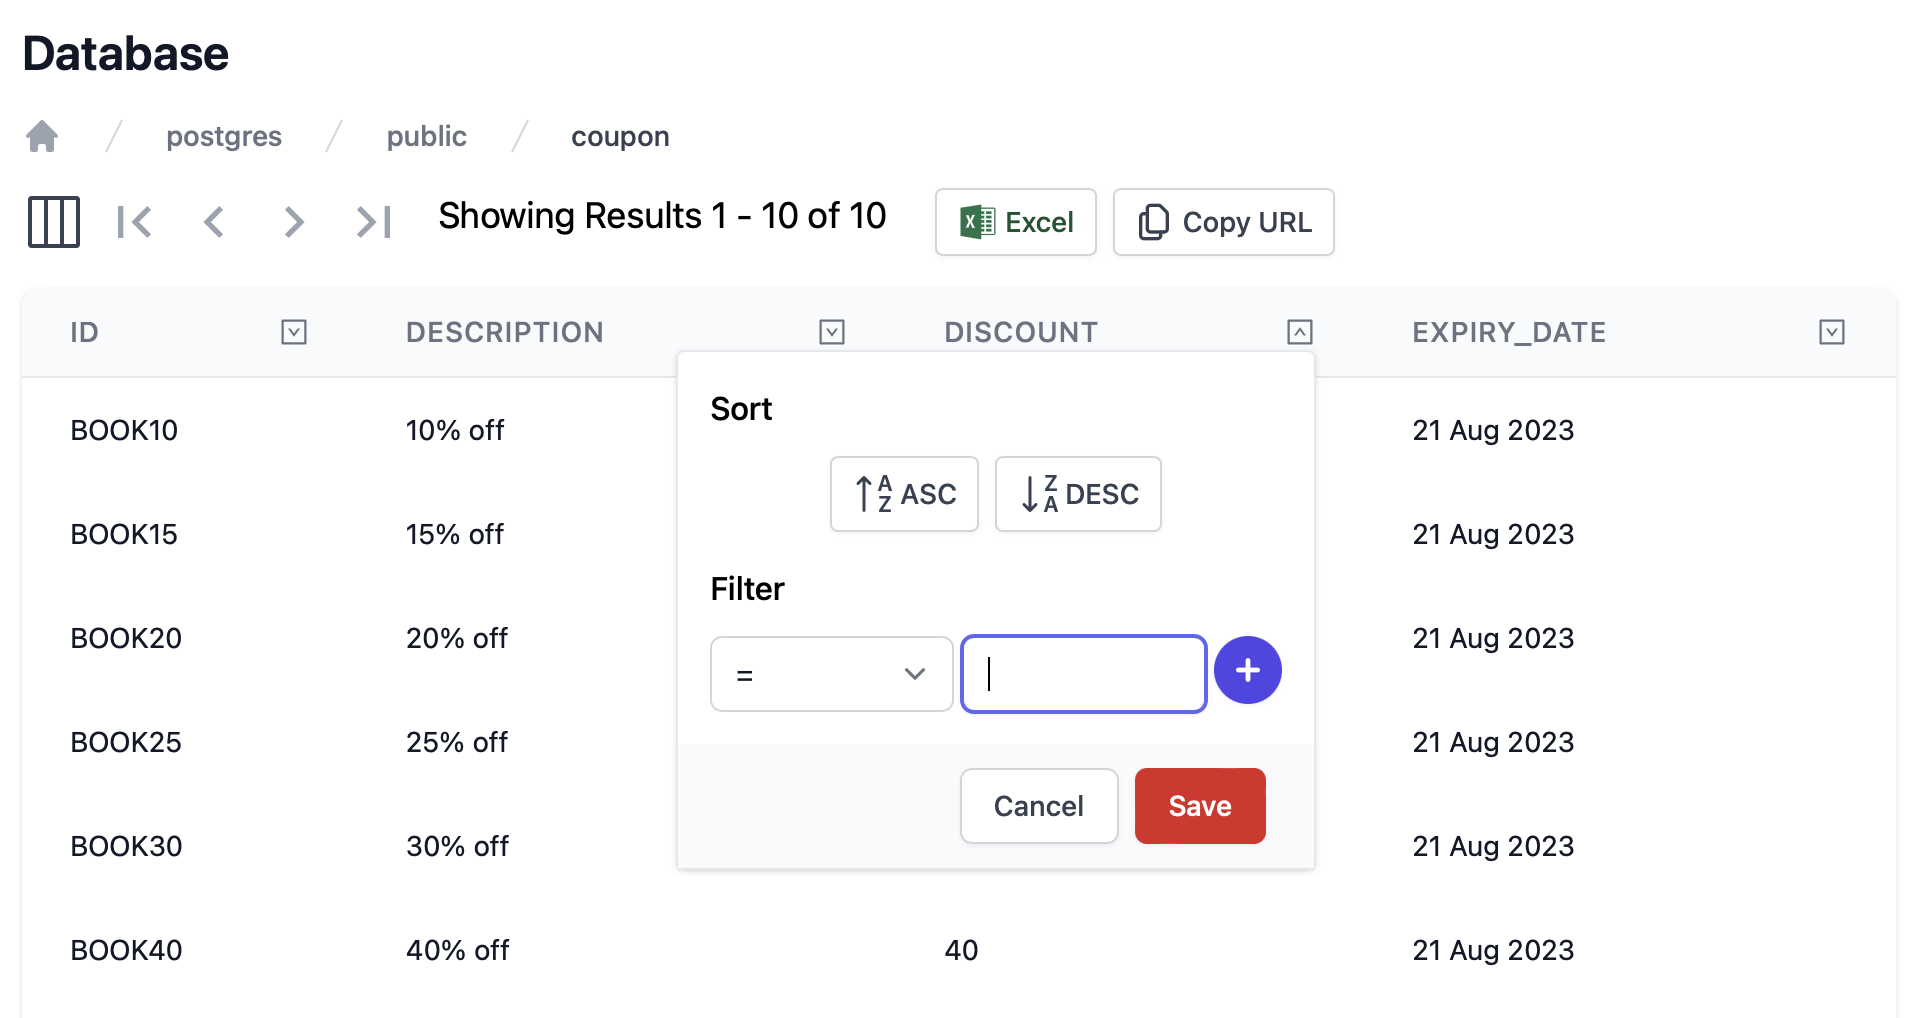
Whose contents can be viewed by drilling down and clicking on each table:
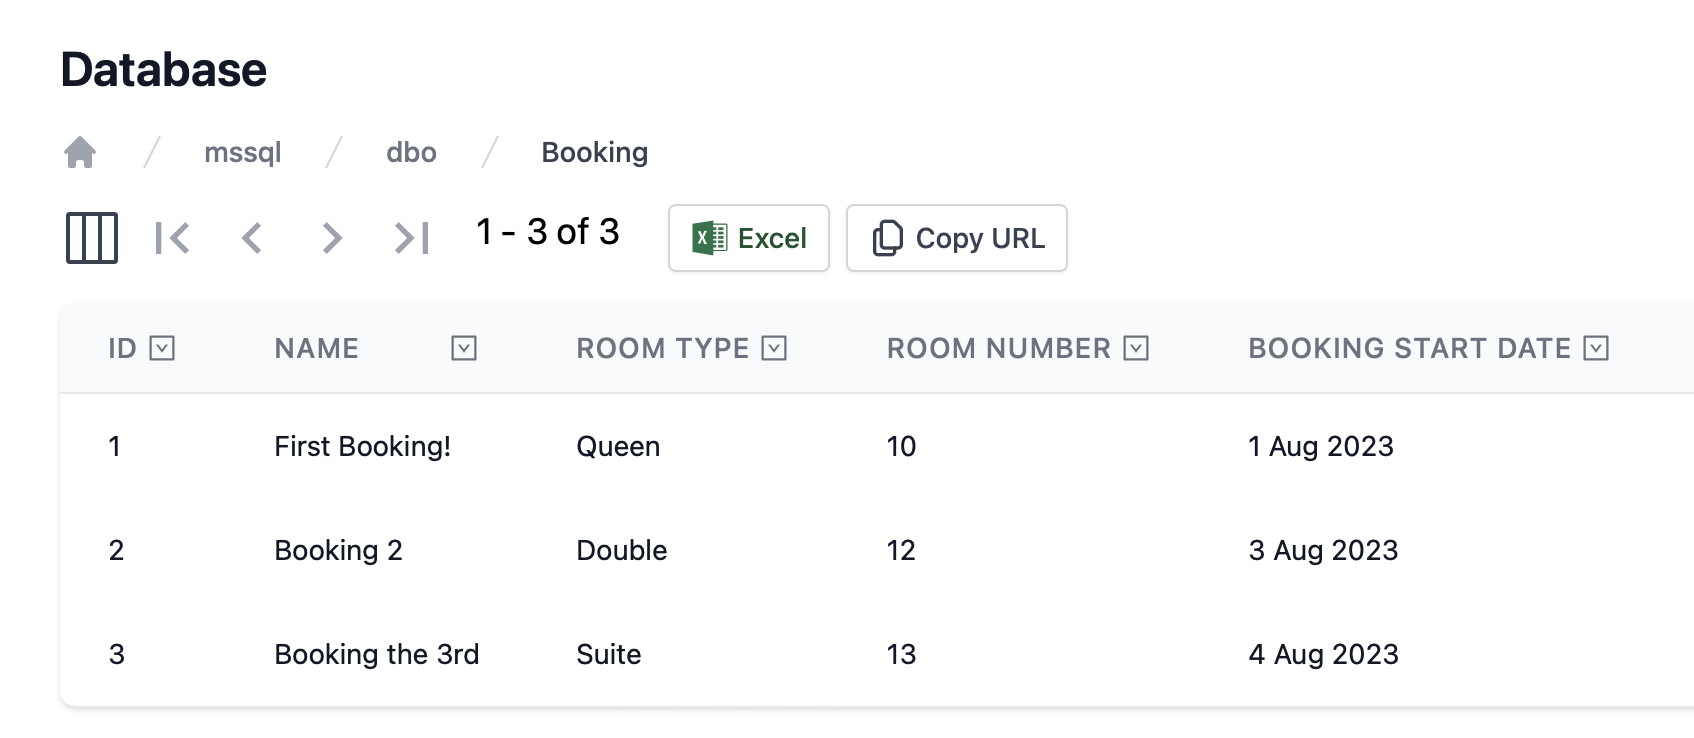
Which displays its rows using the AutoQuery Grid Vue Component that can be sorted and filtered as needed:
Vue .mjs project template features
Whilst you have the App running, check out its other high-productivity features:
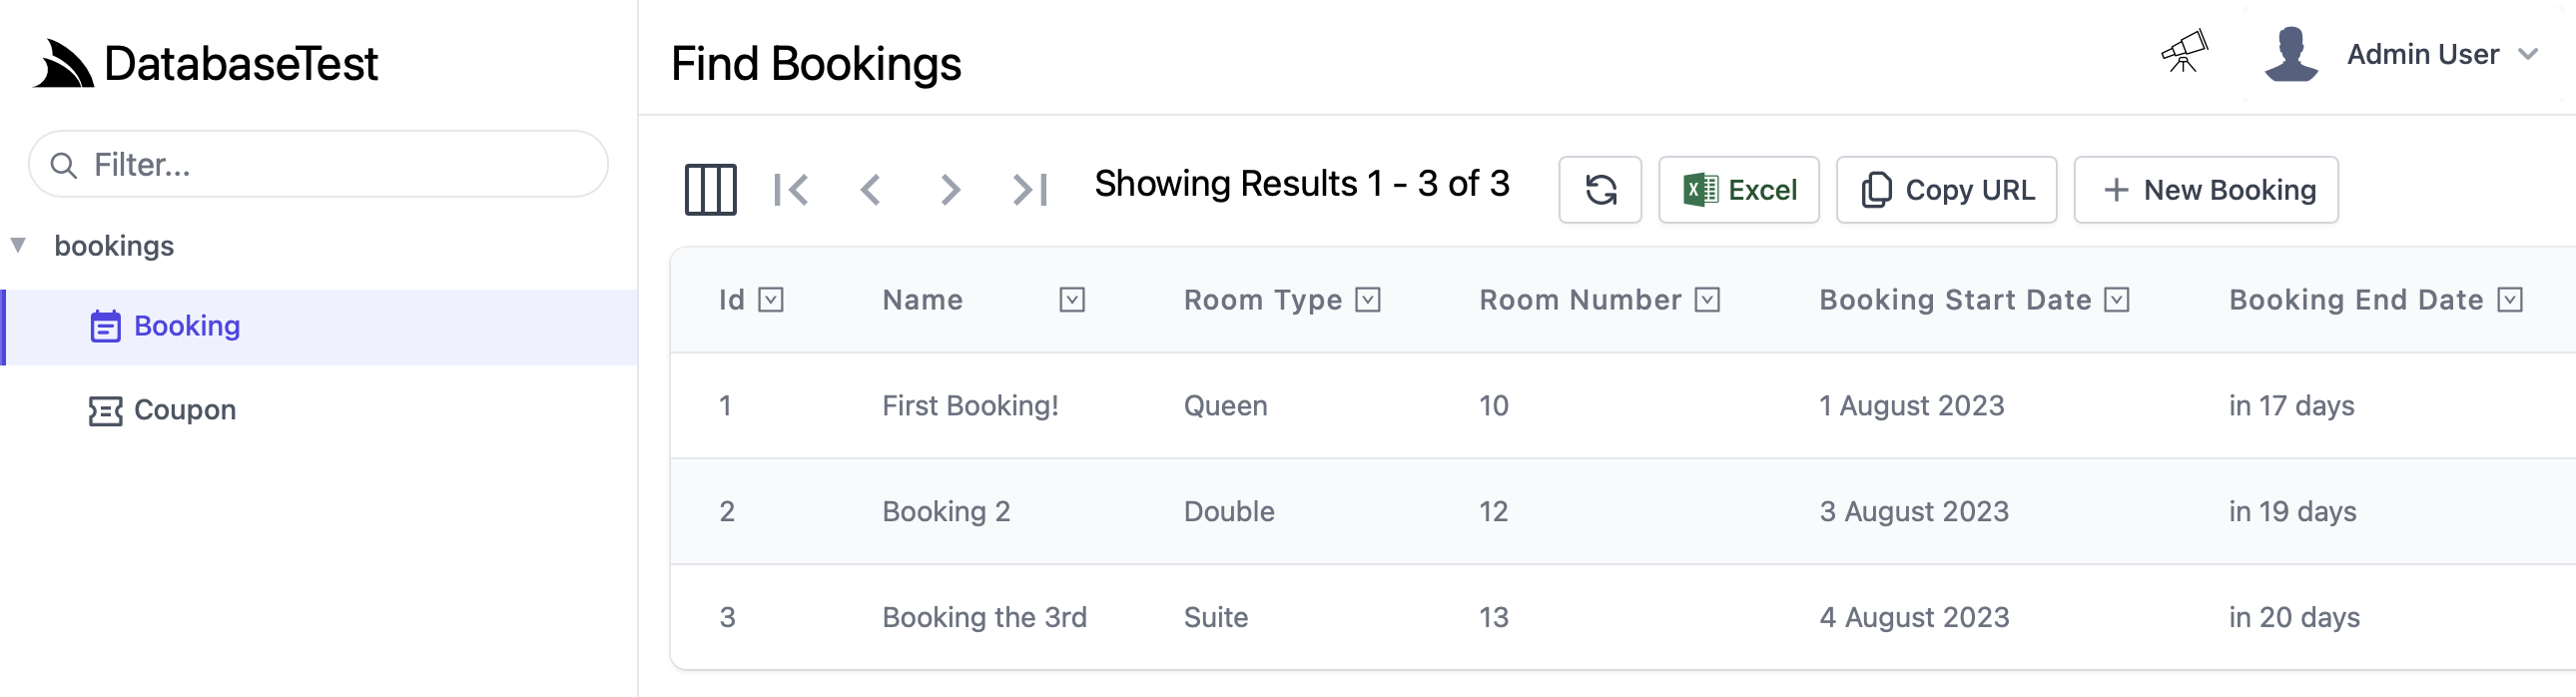
Create a multi-user Booking system with AutoQuery
The App's Bookings APIs are built using AutoQuery CRUD, allowing for rapid development of typed CRUD Services using only declarative POCO DTOs:
In addition, all AutoQuery APIs benefit from the built-in Locode's Auto Management UI:
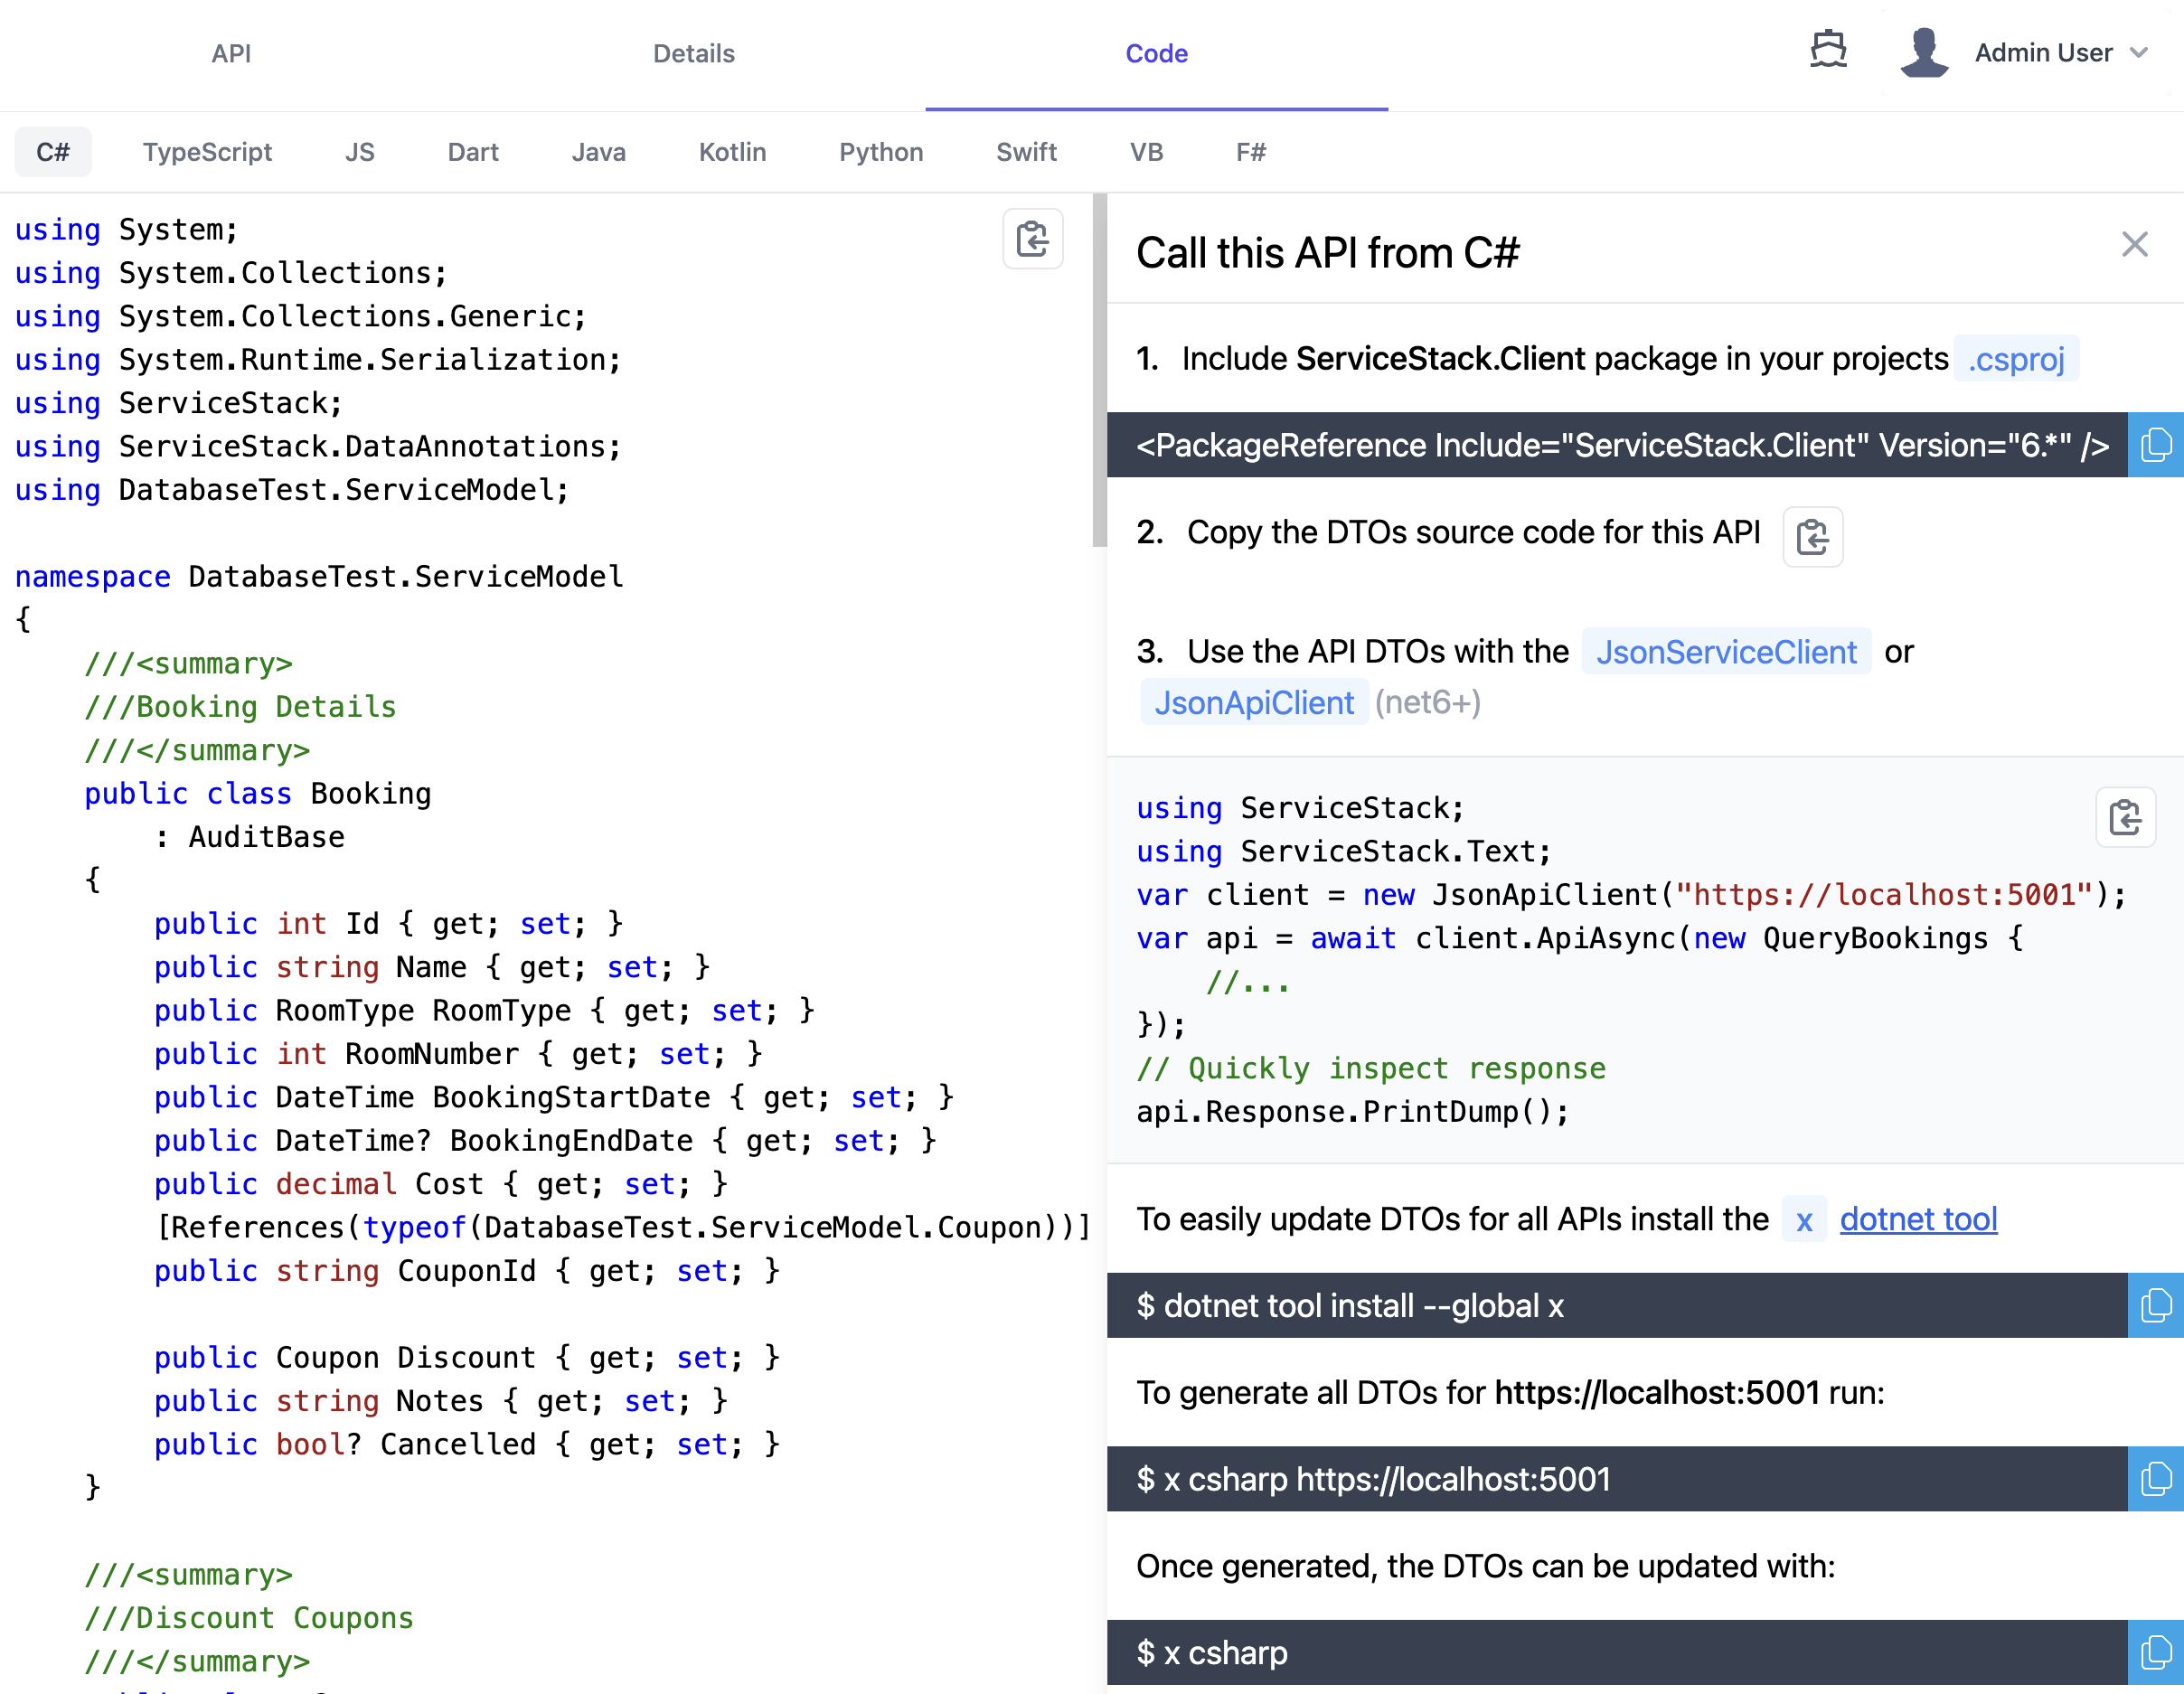
As well as end-to-end typed integrations with the most popular programming languages accessible from the code tab of the built-in API Explorer:
I hope this has been an informative post and highlighted some cool products and features, any questions or feedback is welcome by commenting below.


