Bringing xkcd static dataset to life with AutoQuery


One of the big advantages of using AutoQuery is the ability to turn data into an API with very little effort.
Once your data is exposed as an API, you can use it in any way you want, whether that's a web app, a mobile app, a desktop app, or even a CLI.
Unsiloing Data with AutoQuery
A problem I encountered when working for a weather forecasting company is that modelers and data scientists would often create datasets that were only accessible via Jupyter notebook or a Python script which is hard to reuse or share. This meant that the data was only accessible to a small number of people, and it was difficult to share the data with other teams or to use the data in other applications. Some of these notebooks and scripts would need to use massive datasets for a very small amount of data. The company specialized in weather data and experiments could pull down 100s of GBs of data, but only use a few MBs of it.
Poor data accessibility is still something that slows down teams. While it is 'easier' sometimes for a single developer/modeler/data scientist to just pull data from static files, not having shared access to the data can make it difficult to reproduce or reuse. Web APIs help un-silo the data, create more efficient access points and reduce the time it takes to get data from an experiment into a production application.
ServiceStack and AutoQuery can help solve this problem by making it easy to expose data as an API, and by simplifying the use of that data in any application.
In this post, we'll look at how to use AutoQuery to create a web app from a dataset, and to make it a bit of fun, we are going to use a dataset of XKCD comics. This dataset is from HuggingFace's datasets repository if you want to repeat the process yourself, but any dataset in formats like CSV, JSON, etc or in an existing SQL database like SQLite will work with the same approach.
What is the dataset?
The dataset is licensed under the Creative Commons Attribution-ShareAlike 3.0 license, and the code for this example is available on GitHub.
The dataset contains metadata of 2630 comics from the XKCD website, with the following fields:
- id
- title
- url: xkcd.com URL
- image_url
- explained_url: explainxkcd.com URL
- transcript: english text transcript of the comic
- explanation: english explanation of the comic
AutoQuery Datasources
AutoQuery support different ways of accessing data to make it flexible for different use cases.
The most common way to access data is via a SQL database using AutoQuery RDBMS, but also supports using AutoQuery Data which can with in-memory data, another service or even AWS DynamoDb.
This this example, our data is in a JSONL file which separates row entries by a new line, so we could use AutoQuery Data to load the data into memory and expose it as an API.
First we will declare a class that represents a row of data from our file.
public class XkcdComic
{
    public int Id { get; set; }
    public string Title { get; set; }
    public string ImageTitle { get; set; }
    public string Url { get; set; }
    public string ImageUrl { get; set; }
    public string ExplainedUrl { get; set; }
    public string Transcript { get; set; }
    public string Explanation { get; set; }
}
And then load our data into memory from the JSONL file.
var allLines = "path/to/your/dataset.jsonl".ReadAllText().Split("\n");
using var jsonConfig = JsConfig.With(new Config {
    TextCase = TextCase.SnakeCase
});
var comics = allLines
    .Where(x => !x.IsNullOrEmpty())
    .Select(JsonSerializer.DeserializeFromString<XkcdComic>)
    .ToList();
Now we can add our data as a AutoQueryData source when configuring our AppHost and the AutoQueryDataFeature Plugin.
//AutoQuery Data Plugin
Plugins.Add(new AutoQueryDataFeature { MaxLimit = 100 }
    .AddDataSource(ctx => ctx.MemorySource(comics))
);
And lastly, to expose the data over an API, we declare a Request DTO that inherits from QueryData<XKCDComic>.
[Route("/xkcd")]
public class QueryXkcdComicData : QueryData<XkcdComic> {}
We now have a web API that exposes the our static dataset as an API. Any this already support a lot of different ways you can sort and filter data while also supporting different formats like JSON, CSV, XML and others.
Using QueryDb
Alternatively to using AutoQuery Data, we can use AutoQuery RDBMS to access our data from a SQLite database. This is useful if you have a large dataset that you want to query, but don't want to load all the data into memory.
First we will load the data into the SQLite database.
var dbFactory = new OrmLiteConnectionFactory("App_Data/db.sqlite", SqliteDialect.Provider);
container.Register<IDbConnectionFactory>(dbFactory);

using var db = dbFactory.Open();
if (db.CreateTableIfNotExists<XkcdComic>())
{
    db.InsertAll(comics);
}
Now we can use QueryDb<T> instead of QueryData<T> to access the data from the database, and use the AutoQueryFeature Plugin instead of AutoQueryDataFeature.
//AutoQuery Plugin for RDBMS
Plugins.Add(new AutoQueryFeature { MaxLimit = 100 });
// Use QueryDb<T> instead of QueryData<T>.
[Route("/xkcd")]
public class QueryXkcdComics : QueryDb<XkcdComic> {}
And that's it, we now have an API that we can use to query our XKCD comics data.
Locode
One of the advantages of loading our data into SQLite is taking advantage of the built in Locode App that comes with the ServiceStack.Server library.
Restarting the application, we can now navigate to the Locode App at http://localhost:5000/locode and see our XKCD comics data.
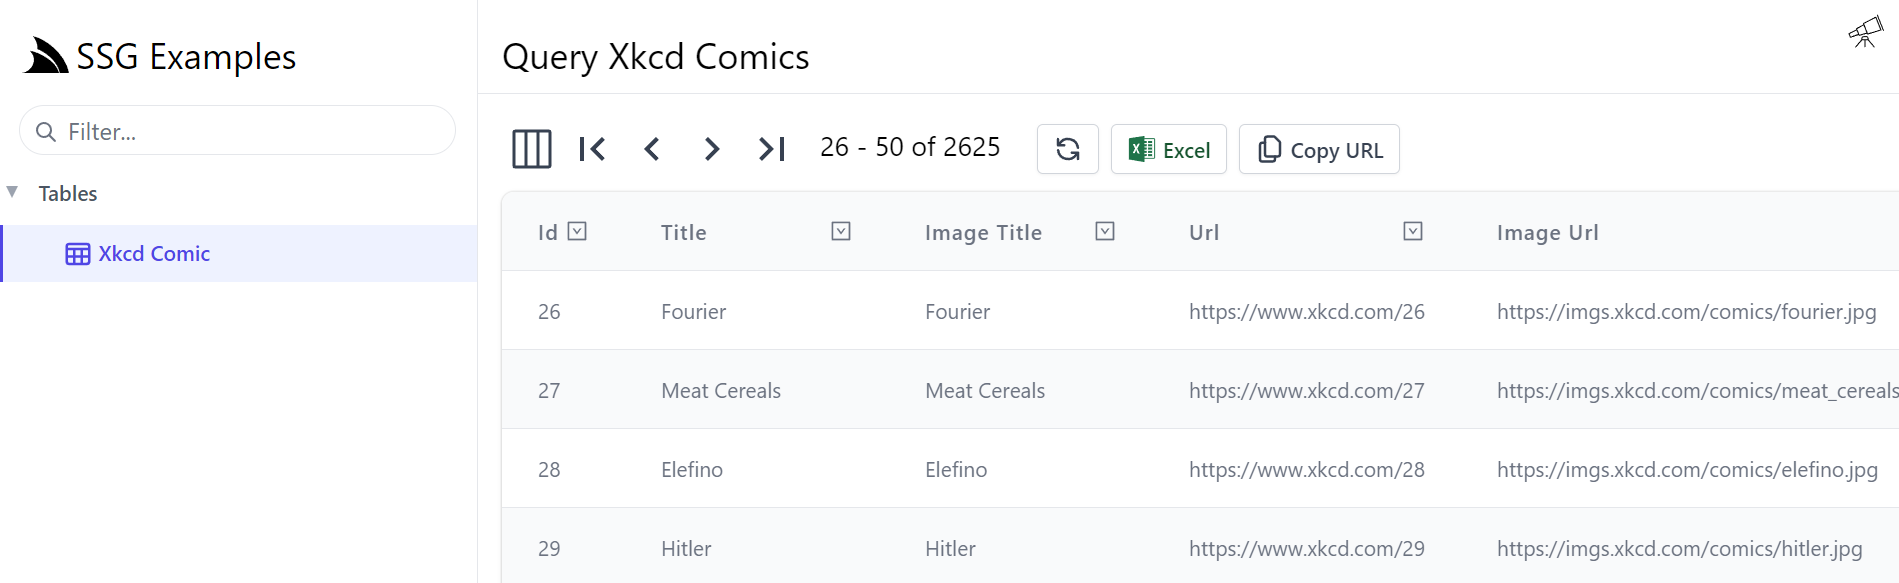
Looking at the UI, we can see we get a table of data with filtering capabilities in a user friendly way. Locode is driven off the web services that are exposed by the AutoQuery API, so we can also use the same data to create a web app.
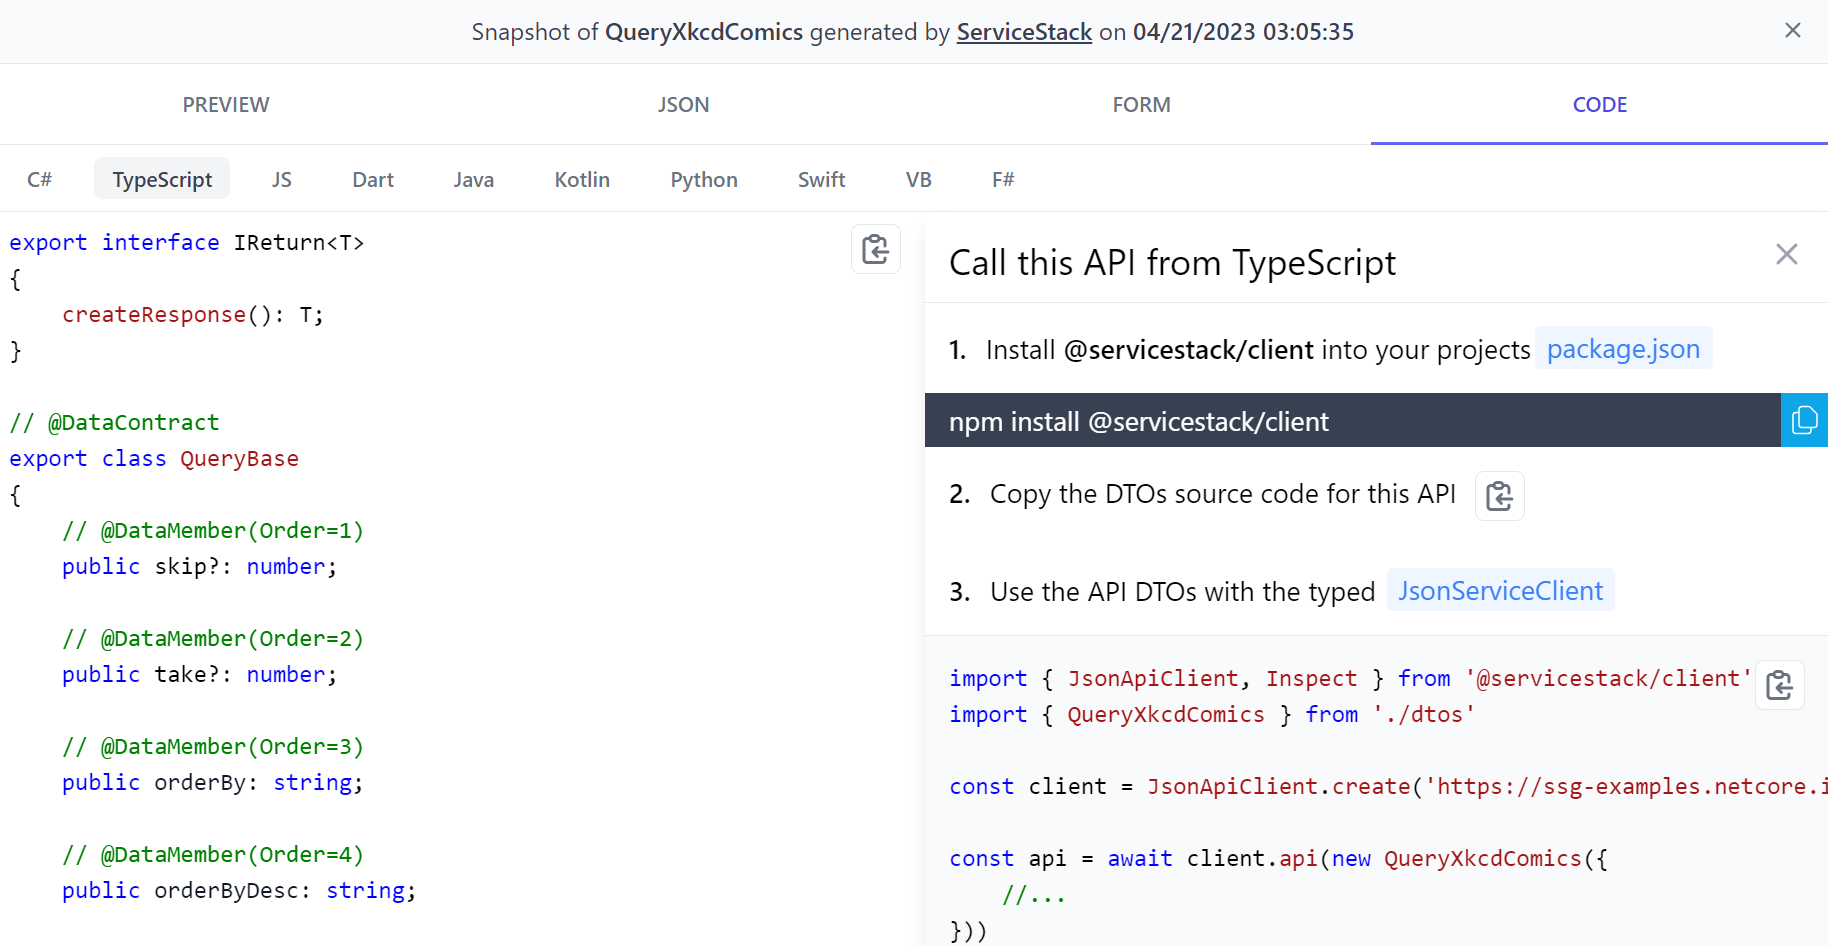
We can look at the endpoint itself and the default Auto HTML API page to see how to interact with the API in 10 different languages.
Creating a web app with Razor and Vue.js
Now our dataset is available from an API, it is far more accessible to using in a variety of different ways. In this example, we've hosted our dataset as a web API, and there is a live demo of the API we can use to create a web app.
We can do this from whatever language you prefer, but for this example, we'll use Razor and Vue.js via the ServiceStack razor-ssg template, and the ServiceStack Vue library to create our web app. One of the reasons we chose to use this template is because we can prerender the whole application as a static site and deploy it to any CDN including GitHub Pages.
You will need the ServiceStack dotnet x tool installed to create a new project from the template.
dotnet tool install -g x
First we'll create a new project from the template.
x new razor-ssg Xkcd
This template comes with Vue 3 and TailwindCSS already configured, so we can get started right away.
It also utilizes JavaScript modules, so we can use the import syntax to import the ServiceStack Vue library without having to use a bundler like Webpack.
We can also create these Vue components inline on our razor pages, which will then be served as static files.This gives us instant feedback when we make changes to our code, instead of having to wait for a build step to complete.
Since our dataset is available directly from our API, this application doesn't need a dataset or other storage and adds another way we can interact with our dataset.
Creating a page with Razor and Vue.js
Now we can create a page to display our XKCD comics data.
We can do this by creating a new Razor page in the Pages folder, and then add a @page directive to the top of the file to declare the route.
We are also going to add the [RenderStatic] attribute to the page to tell the ServiceStack razor-ssg template to prerender the page as a static site.
This server render the page, and then fetch data with Vue.js, which works the same when the page is rendered as static.
@page "/comics-datagrid"
@attribute [RenderStatic]

@{
    ViewData["Title"] = "Xkcd Comics";
}

<div class="py-8">
    <div class="mx-auto max-w-7xl px-4 sm:px-6 lg:px-8">
        <div id="app">
            <data-grid :items="comics"></data-grid>
        </div>
    </div>
</div>

<script type="module">
    import { ref, onMounted } from "vue"
    import { QueryXkcdComics } from "dtos.mjs"
    import { useClient, useUtils } from "@@servicestack/vue"
    import { mount } from "/mjs/app.mjs"

    const App = {
        props: {comics: Array},
        setup(props) {
            const client = useClient()
            const {pushState} = useUtils()
            const comics = ref(props.comics || [])
            const request = ref(new QueryXkcdComics({ take:25 }))

            async function submit() {
                let results = await client.api(request.value)
                comics.value = results.response.results
            }
            onMounted(submit)

            return { comics, request, submit, client }
        }
    };

    mount('#app', App)
</script>
Since we don't yet have the data, we also need to use the ServiceStack client to fetch the data from the API.
We can do this with the useClient hook, which will return the JsonServiceClient instance.
import { useClient, useUtils } from "@@servicestack/vue"
//...
const client = useClient()
Creating a Vue component
Since we don't yet have the data, we also need to use the ServiceStack client to fetch the data from the API.
We can do this with the useClient hook, which will return the JsonServiceClient instance.
const request = ref(new QueryXkcdComics({ take:25 }))

async function submit() {
    let results = await client.api(request.value)
    comics.value = results.response.results
}
onMounted(submit)
Generating the DTOs
However, we don't yet have the QueryXkcdComics Request DTO available in our application since the template isn't aware of the use of the external API.
By default the mjs/dtos.mjs file uses the BaseUrl of https://localhost:5001 to generate the DTOs, but our data is hosted at https://ssg-examples.netcore.io.
We can either change this BaseUrl in the dtos.mjs file or just delete it and regenerate it using:
Any additional updates will read from this BaseUrl and update the dtos.mjs file with the latest DTOs using the command:
x mjs
This command pulls the generated DTOs from the ServiceStack server, and updates the mjs/dtos.mjs file with the latest DTOs.
And this workflow works for any of the ServiceStack client libraries and supported languages.
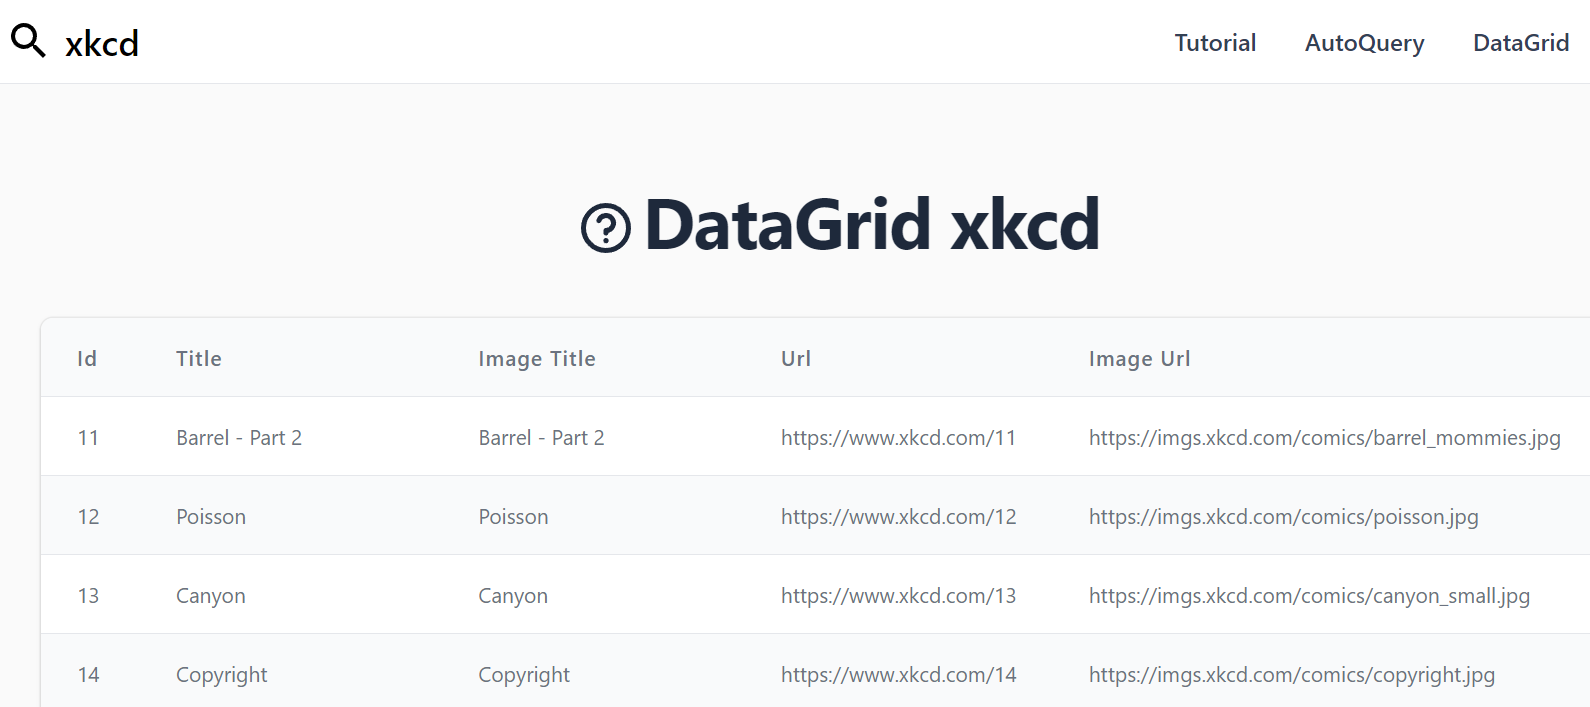
Here we can see the use of the ServiceStack Vue components library and the data-grid component.
The data-grid component is a built in component that will render the data in a table within minimal markup.
This can be a great way to get the instant usability of a table without having to write a lot of code, and it can be used anywhere in your application.
The data-grid itself simply takes the comics array assigned to the items prop, and renders the data in a table.
<div id="app">
    <data-grid :items="comics"></data-grid>
</div>
The data-grid component also has a number of other props that can be used to customize the table, such as selected-columns and header-titles.
Let's now customize the data-grid so we can have a view of the comics.
<data-grid :items="comics"
selected-columns="imageUrl,transcript"
v-on:row-selected="rowSelected" :is-row-selected="row => row == selected"
:header-titles="{ imageUrl:'Comic',transcript: 'Description' }"
class="max-w-screen-lg mx-auto">
<template #imageUrl="{ imageUrl }">
<img :src="imageUrl" class="h-48 object-cover" loading="lazy">
</template>
<template #transcript="{ title, transcript, width, height }">
<div class="flex flex-col max-w-3xl">
<div class="flex justify-between">
<h2 class="text-lg font-semibold text-gray-900">{{ title }}</h2>
<div class="text-right text-sm font-semibold block">{{width}} x {{height}}</div>
</div>
<p class="whitespace-normal break-words overflow-hidden max-h-40">{{ transcript }}</p>
</div>
</template>
</data-grid>
<modal-comic v-if="selected" :comic="selected" v-on:done="selected=null"></modal-comic>
Above we've added a few more props to the data-grid component to customize the columns we want to display using selected-columns, and the titles of the columns by setting header-titles to a map of the column names to the titles we want to display.
We are also using templates to customize the rendering of the imageUrl and transcript columns to have more control over the layout.
AutoQueryGrid vs DataGrid
While the data-grid component is a great way to get a table up and running quickly, we can get even more functionality with the auto-query-grid component.
The auto-query-grid component is a wrapper around the data-grid component that adds a number of features to make it easier to use.
The auto-query-grid component will automatically fetch the data for you, and we can customize our columns using the same template pattern as the data-grid.
<auto-query-grid type="XkcdComic"
selected-columns="imageUrl,width,height,id,title,transcript,explanation,url"
:visible-from="{ title:'sm', transcript:'xl', explanation:'2xl', url:'never' }"
:header-titles="{ imageUrl:'Comic', transcript:'Description' }"
v-on:row-selected="rowSelected"
class="mx-auto">
<template #imageUrl="{ id, imageUrl }">
<img :src="imageUrl" class="h-12 object-cover" loading="lazy">
</template>
<template #transcript="{ transcript }">
<p class="block max-w-sm text-ellipsis overflow-hidden"
:title="transcript">{{ transcript }}
</p>
</template>
<template #explanation="{ explanation }">
<p class="block max-w-sm text-ellipsis overflow-hidden">{{ explanation }}</p>
</template>
</auto-query-grid>
<modal-comic v-if="selected" :comic="selected" v-on:done="selected=null"></modal-comic>
So the only custom behavior code you need is to wire up the modal-comic component to the auto-query-grid component, is the following:
setup(props) {
    const selected = ref()
    function rowSelected(comic,e) {
        selected.value = comic
    }
    return { selected, rowSelected }
}
Custom Grid with a Search Box
We can also fetch the data from the API dynamically using the JsonServiceClient from the ServiceStack Vue library, and use AutoQuery to easily filter for the data we want.
Let's create a separate page that will allow us to search comics by title, this time on our Index page.
We'll update our Index.cshtml file to the following markup.
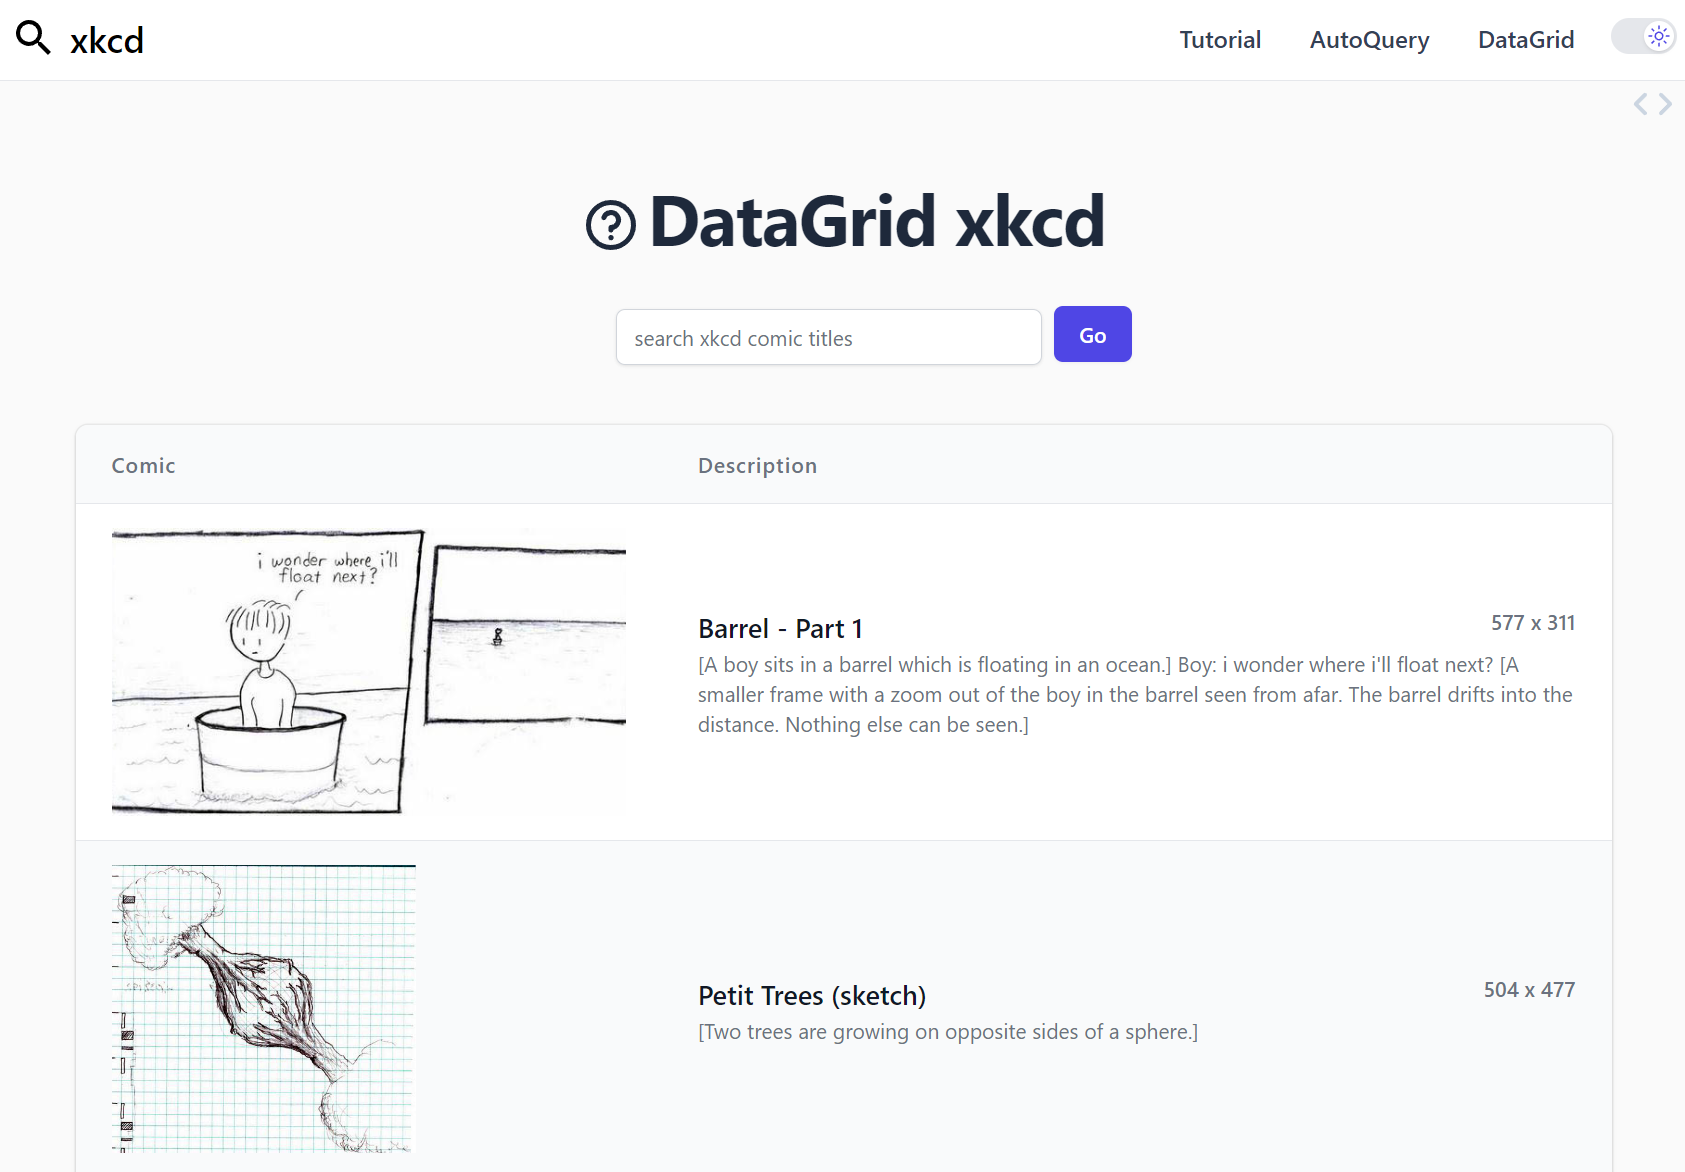
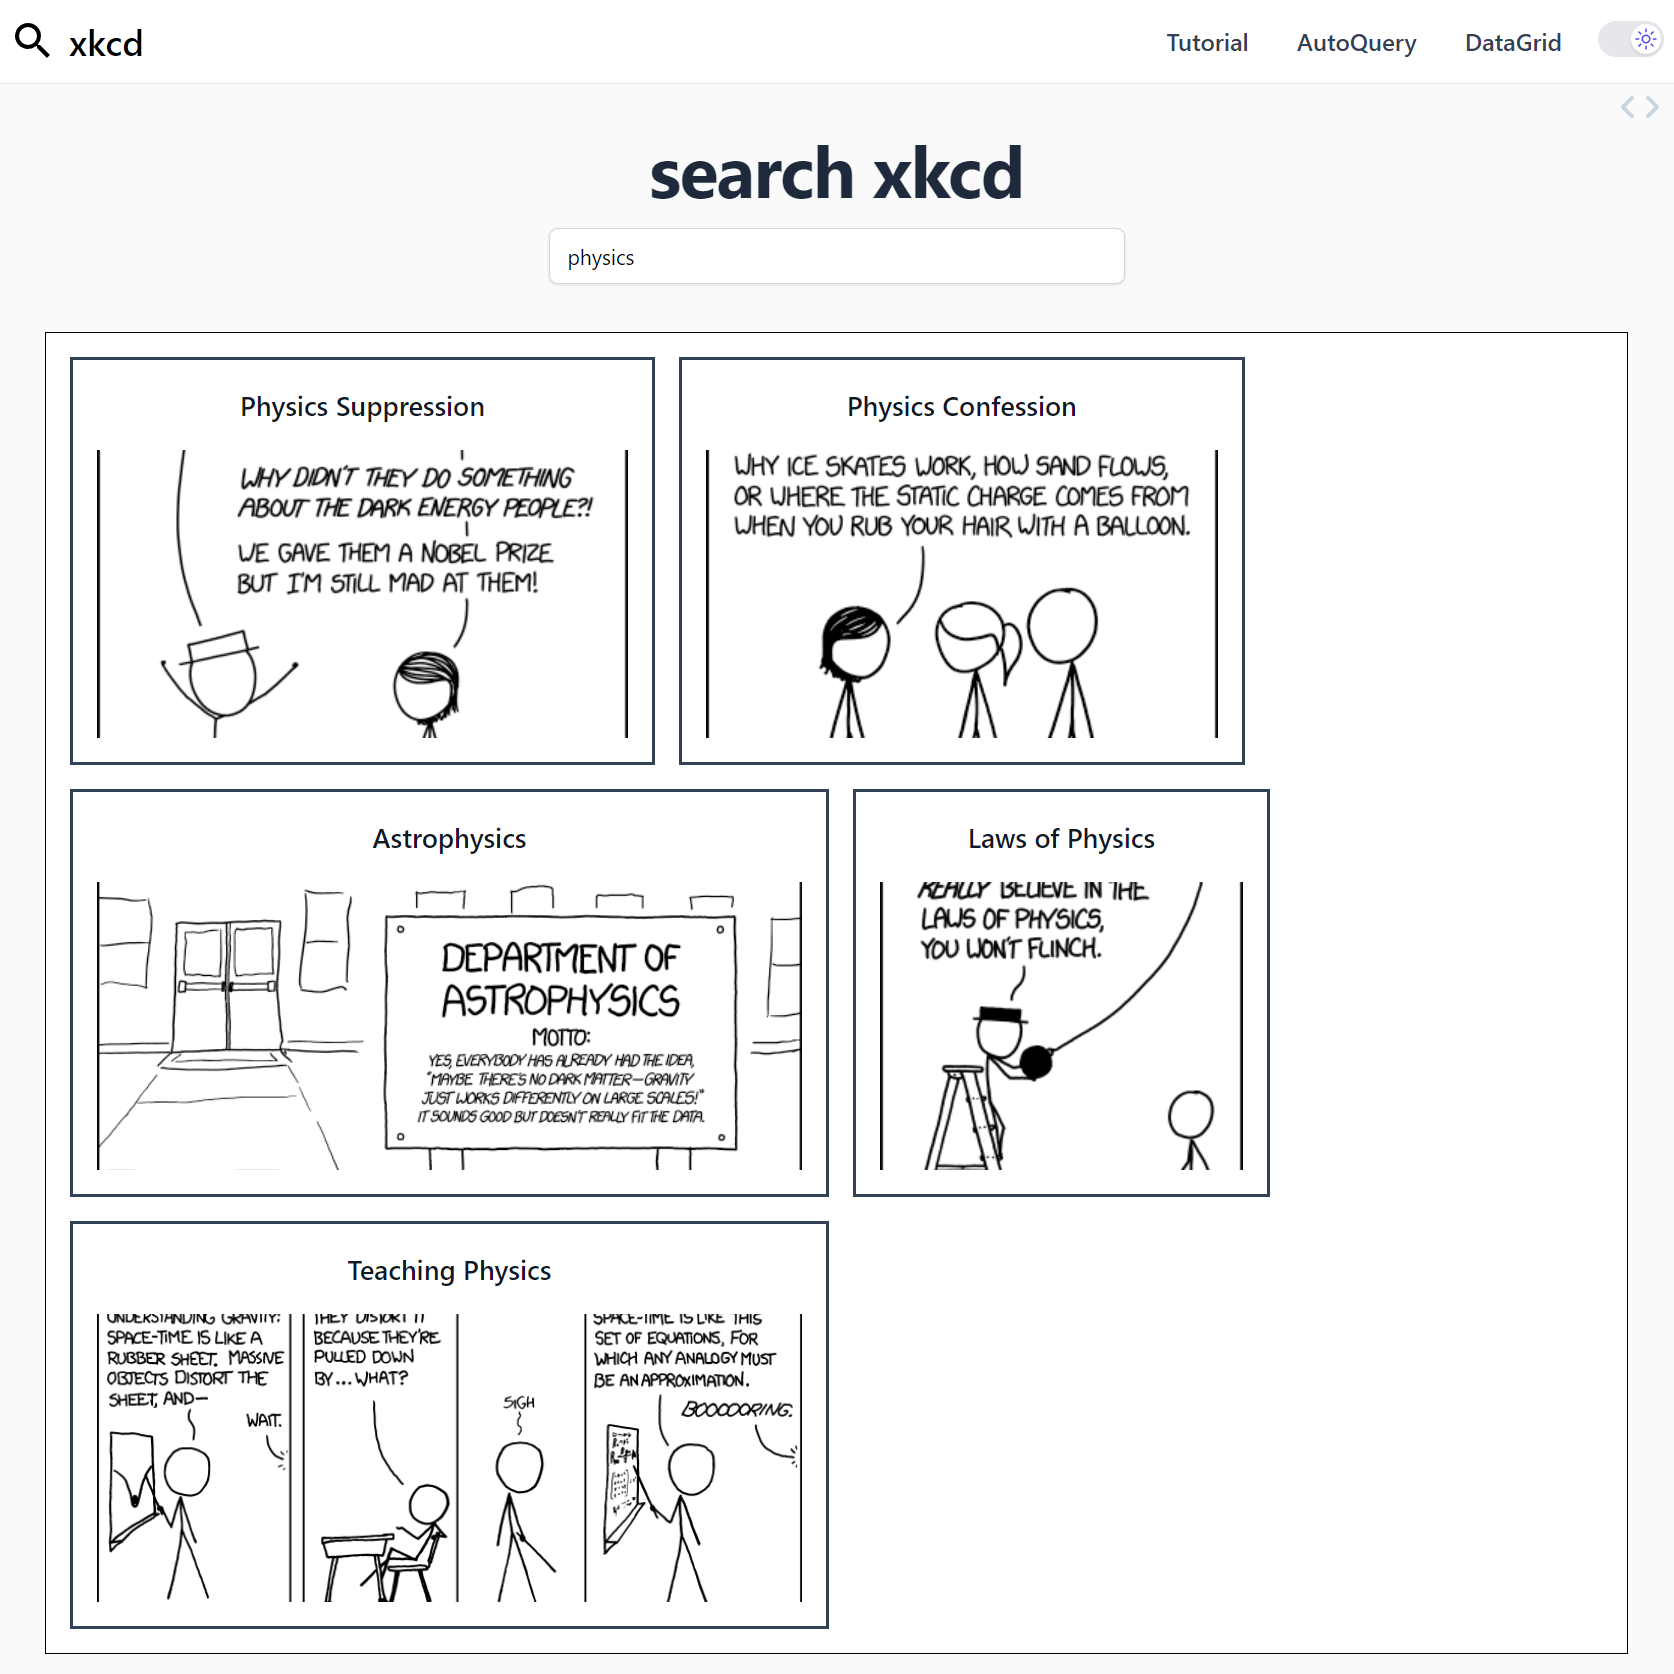
First we'll add a search box to the top of the page to allow us to search for comics by title then display xkcd comics in a custom flexbox:
<div id="app">
<div class="flex flex-1 flex-col overflow-hidden">
<div class="mb-8 mx-auto w-96">
<h2 class="text-center mb-4 max-w-4xl font-display
text-5xl font-bold tracking-tight text-slate-800
dark:text-slate-200">
search xkcd
</h2>
<text-input v-cloak
class="w-full w-prose w-100"
type="search"
v-model="searchTerm"
placeholder="search xkcd comic titles">
</text-input>
</div>
<div v-cloak>
<div v-if="!loading && hasInit"
class="w-full pb-4 bg-white dark:bg-black border
border-black flex flex-wrap">
<div v-if="comics.length"
class="border-2 border-slate-700 ml-4 mt-4 p-4
flex justify-center items-center
hover:shadow-lg hover:bg-slate-50
dark:hover:bg-slate-900 max-w-[48%]"
v-for="comic in comics">
<div v-on:click="showModal(comic)"
class="cursor-pointer">
<h2 class="mb-4 text-lg font-semibold text-gray-900
dark:text-gray-100 text-center">
{{ comic.title }}
</h2>
<img :src="comic.imageUrl" :width="comic.width"
:height="comic.height" class="h-48 object-cover"
:aria-description="comic.explanation"
:alt="comic.transcript" loading="lazy">
</div>
</div>
<div v-else class="w-full">
<h4 class="text-center text-lg pt-8 pb-4">
query returned no results
</h4>
</div>
</div>
<div v-else class="flex justify-center items-center pt-8">
<loading>searching xkcd...</loading>
</div>
</div>
<modal-comic v-if="selected" :comic="selected"
v-on:done="done">
</modal-comic>
</div>
</div>
Let's create our new component to display our initial data in a grid layout, and also have a search box at the top that we can use to make additional API calls to filter the data from the AutoQuery API.
We can do this again by using the JsonServiceClient with the Request DTO related to the API we want to call, but this time we will also pass some additional parameters to the QueryXkcdComics DTO to filter the data.
import { ref, watch, onMounted } from "vue"
import { mount } from "app.mjs"
import { QueryXkcdComics } from "dtos.mjs"
import { useClient, useUtils } from "@@servicestack/vue"
import { queryString } from "@@servicestack/client"
const App = {
    setup(props) {
        const comics = ref(props.comics || [])
        const qs = queryString(location.search)
        const searchTerm = ref(qs.q || '')
        const client = useClient()
        const { pushState } = useUtils()
        const selected = ref()

        const loading = ref(false)
        const hasInit = ref(false)
        onMounted(async () => {
            if (qs.q) {
                let api = await client.api(
                    new QueryXkcdComics({ titleContains:searchTerm.value, orderByDesc:'id' }))
                comics.value = api.response.results
            } else {
                await init()
            }
            if (qs.id) {
                showModal(comics.value.find(x => x.id == qs.id))
            }
            hasInit.value = true
        })

        async function init() {
            loading.value = true;
            let randomIds = generateRandomNumbers(1,2630,12)
            if (qs.id) randomIds.unshift(parseInt(qs.id))
            let results = await client.api(new QueryXkcdComics({ ids:randomIds }))
            comics.value = results.response.results
            loading.value = false
        }
        const searchApi = createDebounce(async (query) => {
            if (!query || query.length === 0) {
                pushState({ q: undefined })
                let randomIds = generateRandomNumbers(1,2630,12);
                let api = await client.api(new QueryXkcdComics({ ids:randomIds }))
                if (api.succeeded) {
                    comics.value = api.response.results
                }
            } else {
                pushState({ q: searchTerm.value })

                await (async (titleContains) => {
                    let api = await client.api(
                        new QueryXkcdComics({ titleContains, orderByDesc:'id' }))
                    // discard any invalidated api responses
                    if (titleContains === searchTerm.value) {
                        comics.value = api.response.results
                    }
                })(searchTerm.value)
            }
            loading.value = false
        },250)
        watch(searchTerm, async(newValue,oldValue) => {
            loading.value = true
            searchApi(newValue)
        })
        function createDebounce(fnc, delayMs) {
            let timeout = null;
            return (...args) => {
                clearTimeout(timeout);
                timeout = setTimeout(() => {
                    fnc(...args);
                }, delayMs || 500);
            };
        }

        function showModal(comic) {
            selected.value = comic;
            pushState({ id:comic?.id || undefined })
        }
        function done() {
            showModal(null)
        }
        function generateRandomNumbers(low, high, count) {
            const result = [];
            for (let i = 0; i < count; i++) {
                result.push(Math.floor(Math.random() * (high - low + 1) + low));
            }
            return result;
        }

        return { comics, searchTerm, hasInit, loading, selected, showModal, done }
    },
}
mount('#app', App)
Notice here we're creating the Request DTO with:
new QueryXkcdComics({ titleContains, orderByDesc:'id' })
The titleContains property is interpreted by the AutoQuery API to filter the results by the title column in our
SQLite database by the populated property value.
We didn't need to add this additional functionality, and this syntax works for any matching property on the DTO.
E.g, we could have used explanationContains to filter the results by the explanation column in our SQLite database on our API server.
AutoQuery has many of these types of features built in that work out of the box, and since AutoQuery services are ServiceStack services,
you can customize their behaviour by adding your own custom logic to the service.
Conclusion
In this post we've seen how we can use the AutoQuery API to quickly create a REST API for our data, and then use the ServiceStack Vue library to quickly create a Vue application that can consume the API.
We've also seen how we can use the x tool to update our client DTOs to match the latest generated DTOs from the ServiceStack server.
This typed end-to-end workflow is a great way to quickly create a full-stack application, and the ServiceStack Vue library is a great way to quickly create a Vue application that can consume the AutoQuery API.
Links
- Live Demo UI - https://xkcd.netcore.io
- Live Demo API - https://ssg-examples.netcore.io/ui/QueryXkcdComics
- UI Source Code - https://github.com/NetCoreApps/Xkcd
- API Source Code - ExampleDataApis.ServiceModel/Xkcd.cs
Let us know what you think of the ServiceStack Vue library, and if you have any feedback or suggestions for improvements.